Connectors
Overview
Section titled “Overview”The Connect to Source panel allows administrators to link cloud storage services — Dropbox, Microsoft OneDrive, and Microsoft SharePoint — to the application. Once connected, you can browse folders, select files, and kick off background processing that extracts text, generates embeddings, and indexes content for AI-powered search. Only vectors and file links are stored; file content is streamed when needed for citations.
Table of Contents
Section titled “Table of Contents”- Accessing the Connect to Source Panel
- Adding a Connector
- Opening the Browse Modal
- Browsing and Selecting Files — Dropbox
- Browsing and Selecting Files — OneDrive
- Browsing and Selecting Files — SharePoint
- Processing Selected Files
- Background Jobs
- Troubleshooting
Accessing the Connect to Source Panel
Section titled “Accessing the Connect to Source Panel”- Log in with admin privileges
- Open the Admin Dashboard from the main navigation
- Select the “Connectors” tab
For a map of all Admin Dashboard tabs, see the Administration Introduction.
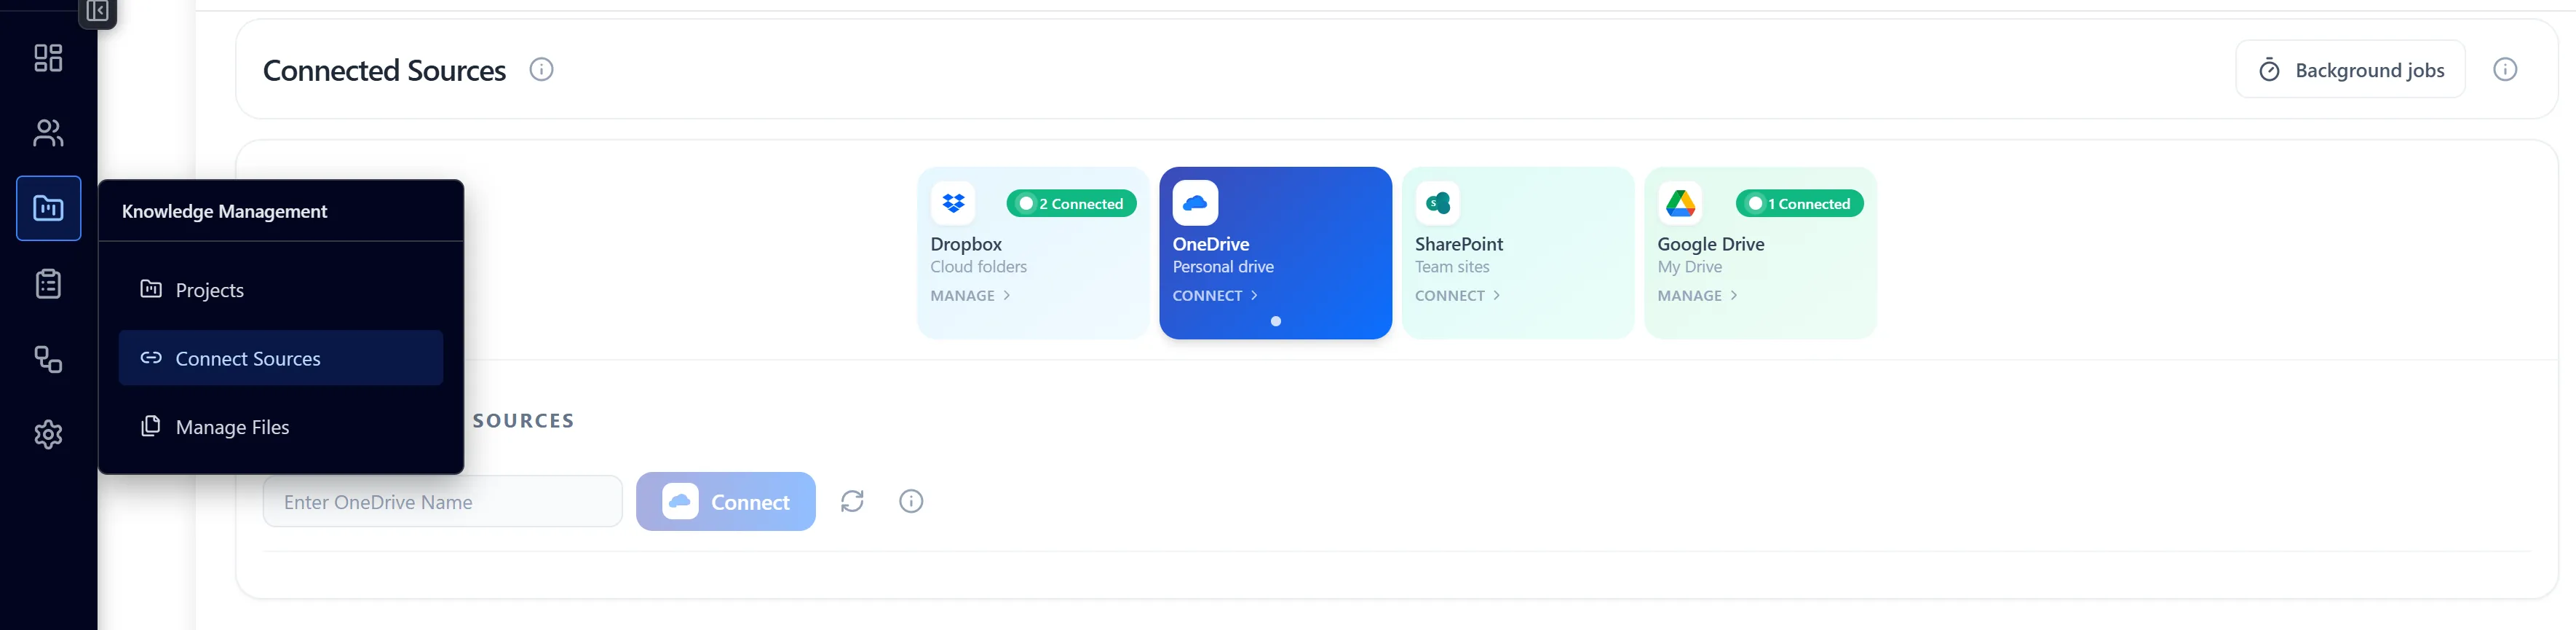
The panel displays:
- A Dropbox integration card
- A Microsoft integration card (for both OneDrive and SharePoint)
- A list of your existing connectors as source pills
Adding a Connector
Section titled “Adding a Connector”Adding a Dropbox Connector
Section titled “Adding a Dropbox Connector”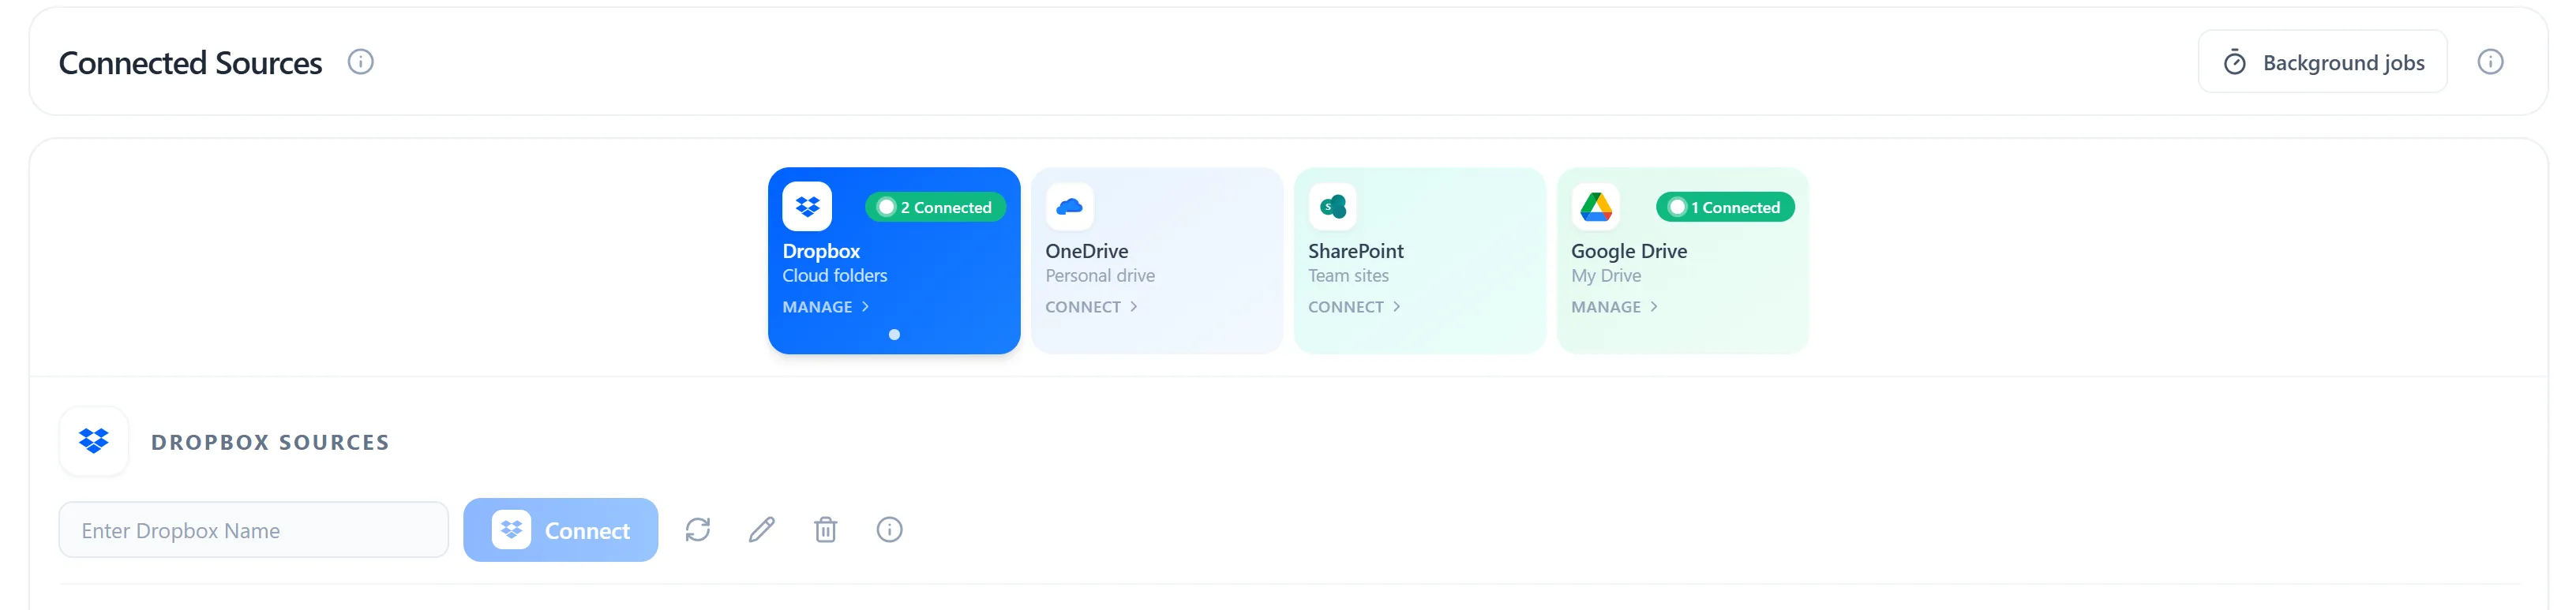
- In the Dropbox integration card, type a display name for this connector (e.g. “Marketing Assets”) in the name input field
- Click Connect Dropbox
- Your browser will be redirected to Dropbox OAuth — log in and grant access when prompted
- After authorisation you are returned to the panel automatically
- The new connector appears as a source pill beneath the integration card
Note: You can add multiple Dropbox connectors, each scoped to a different Dropbox account or team member file.
Adding a Microsoft Connector (OneDrive or SharePoint)
Section titled “Adding a Microsoft Connector (OneDrive or SharePoint)”
- In the Microsoft integration card, select the source type using the OneDrive / SharePoint toggle:
- SharePoint — Team sites and document libraries
- OneDrive — Personal drive files
- Type a display name for this connector
- Click Connect Microsoft
- Your browser will be redirected to Microsoft OAuth — sign in with your Microsoft 365 account and consent to the requested permissions
- After authorisation you are returned to the panel automatically
- The new connector appears as a source pill labelled with the display name you chose
Tip: The source type (OneDrive vs SharePoint) is locked when the connector is created and determines which sections are available when browsing.
Opening the Browse Modal
Section titled “Opening the Browse Modal”Once one or more connectors exist, you select a source to browse its files.
Step 1: Select a Source Pill
Section titled “Step 1: Select a Source Pill”- Locate the row of source pills (coloured tags) beneath the integration card
- Click the pill for the connector you want to browse
- The pill highlights to show it is active
Step 2: Open the Connector
Section titled “Step 2: Open the Connector”- Click the Open button (or double-click the pill) to open the full Browse modal
- The modal slides in from the right side of the admin panel at full height
- A loading spinner appears while the root folder listing is fetched
Step 3: Modal Controls
Section titled “Step 3: Modal Controls”At the top of the browse modal you will see:
| Control | Purpose |
|---|---|
| Connector name | Shows the currently open connector |
| Shared link / Scope URL field | Optionally scope the browse tree to a folder link (Dropbox) or a specific URL (OneDrive/SharePoint) |
| EXIT button | Closes the browse modal and returns to the source list |
Browsing and Selecting Files — Dropbox
Section titled “Browsing and Selecting Files — Dropbox”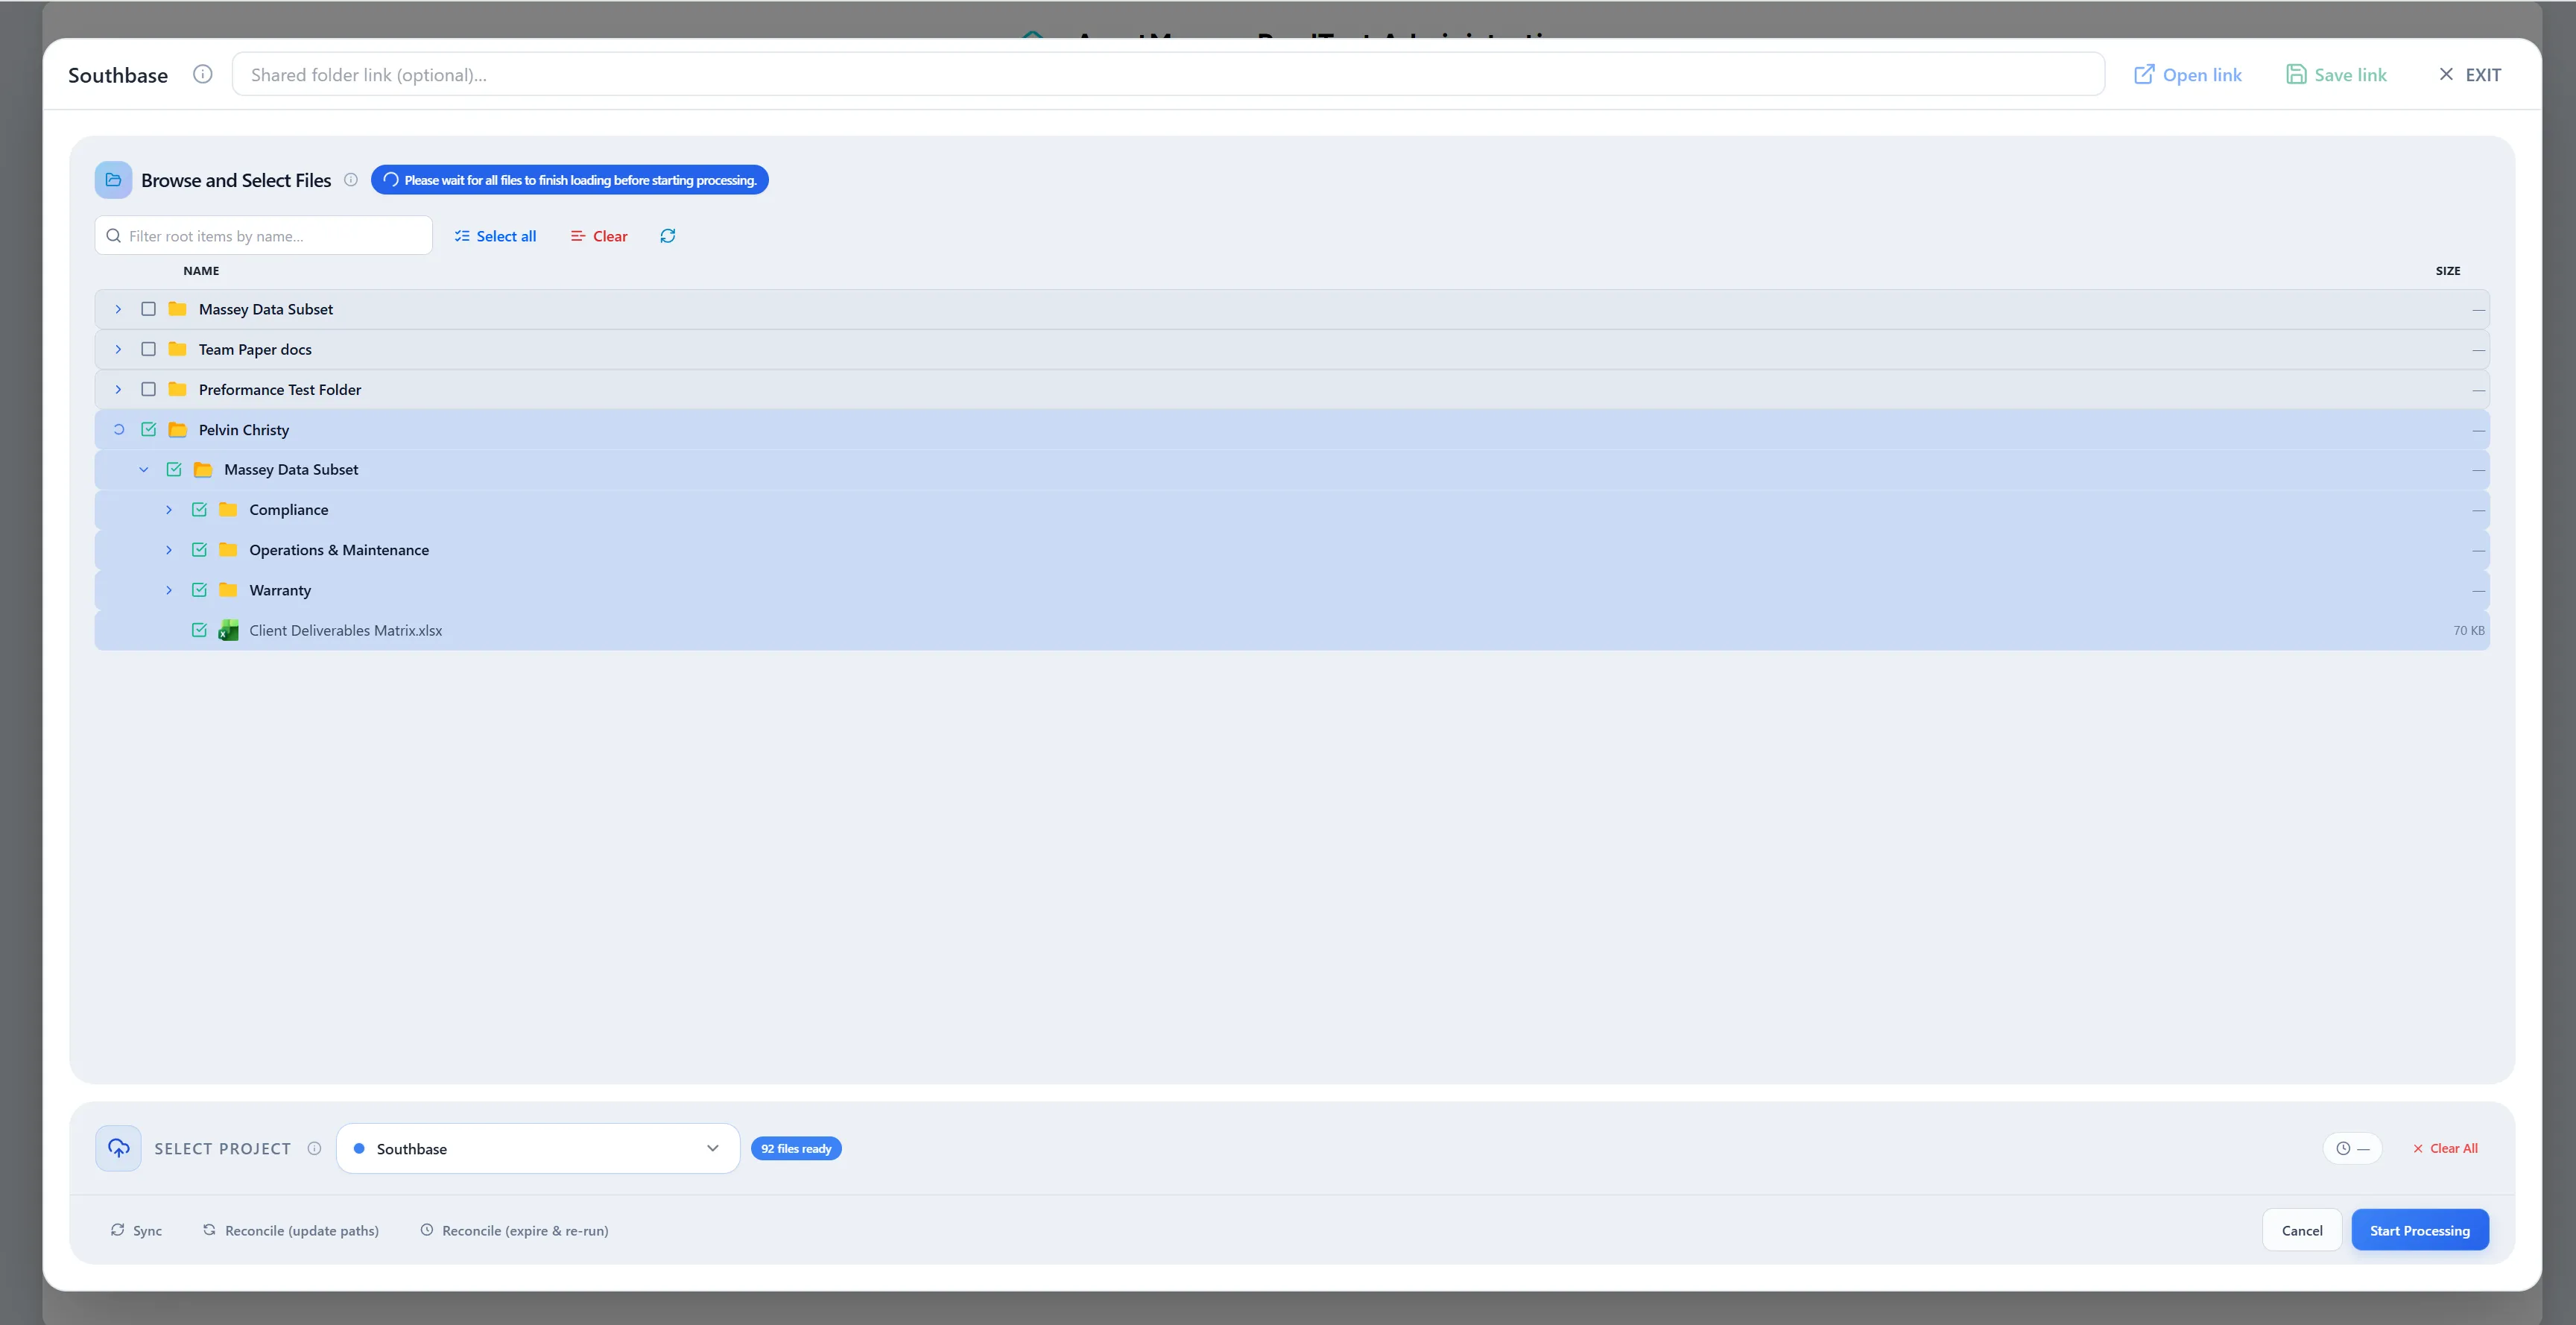
Step 1: Optional — Set a Shared Link (Scoped Browse)
Section titled “Step 1: Optional — Set a Shared Link (Scoped Browse)”- In the shared link input field at the top of the modal, paste a Dropbox folder or file shared link
- Click Open URL to browse only that linked folder
- Optionally click Save URL to persist the link to the connector so it loads automatically next time
Leave the field empty to browse the root of the connected Dropbox account.
Step 2: Browse the Folder Tree
Section titled “Step 2: Browse the Folder Tree”- The file and folder tree loads automatically
- Click the arrow / chevron next to any folder to expand it
- Child items load inline — the tree is lazy-loaded, so deeper levels fetch on demand
- A loading spinner appears next to a folder while its children are being fetched
Step 3: Select Files and Folders
Section titled “Step 3: Select Files and Folders”- Check the checkbox next to any file or folder to select it
- Selecting a folder selects all files inside it recursively at processing time (you do not need to expand it)
- The header updates to show a green badge: “X files selected” or “X files + Y folders (processed recursively) selected”
- Uncheck an item to deselect it
Browsing and Selecting Files — OneDrive
Section titled “Browsing and Selecting Files — OneDrive”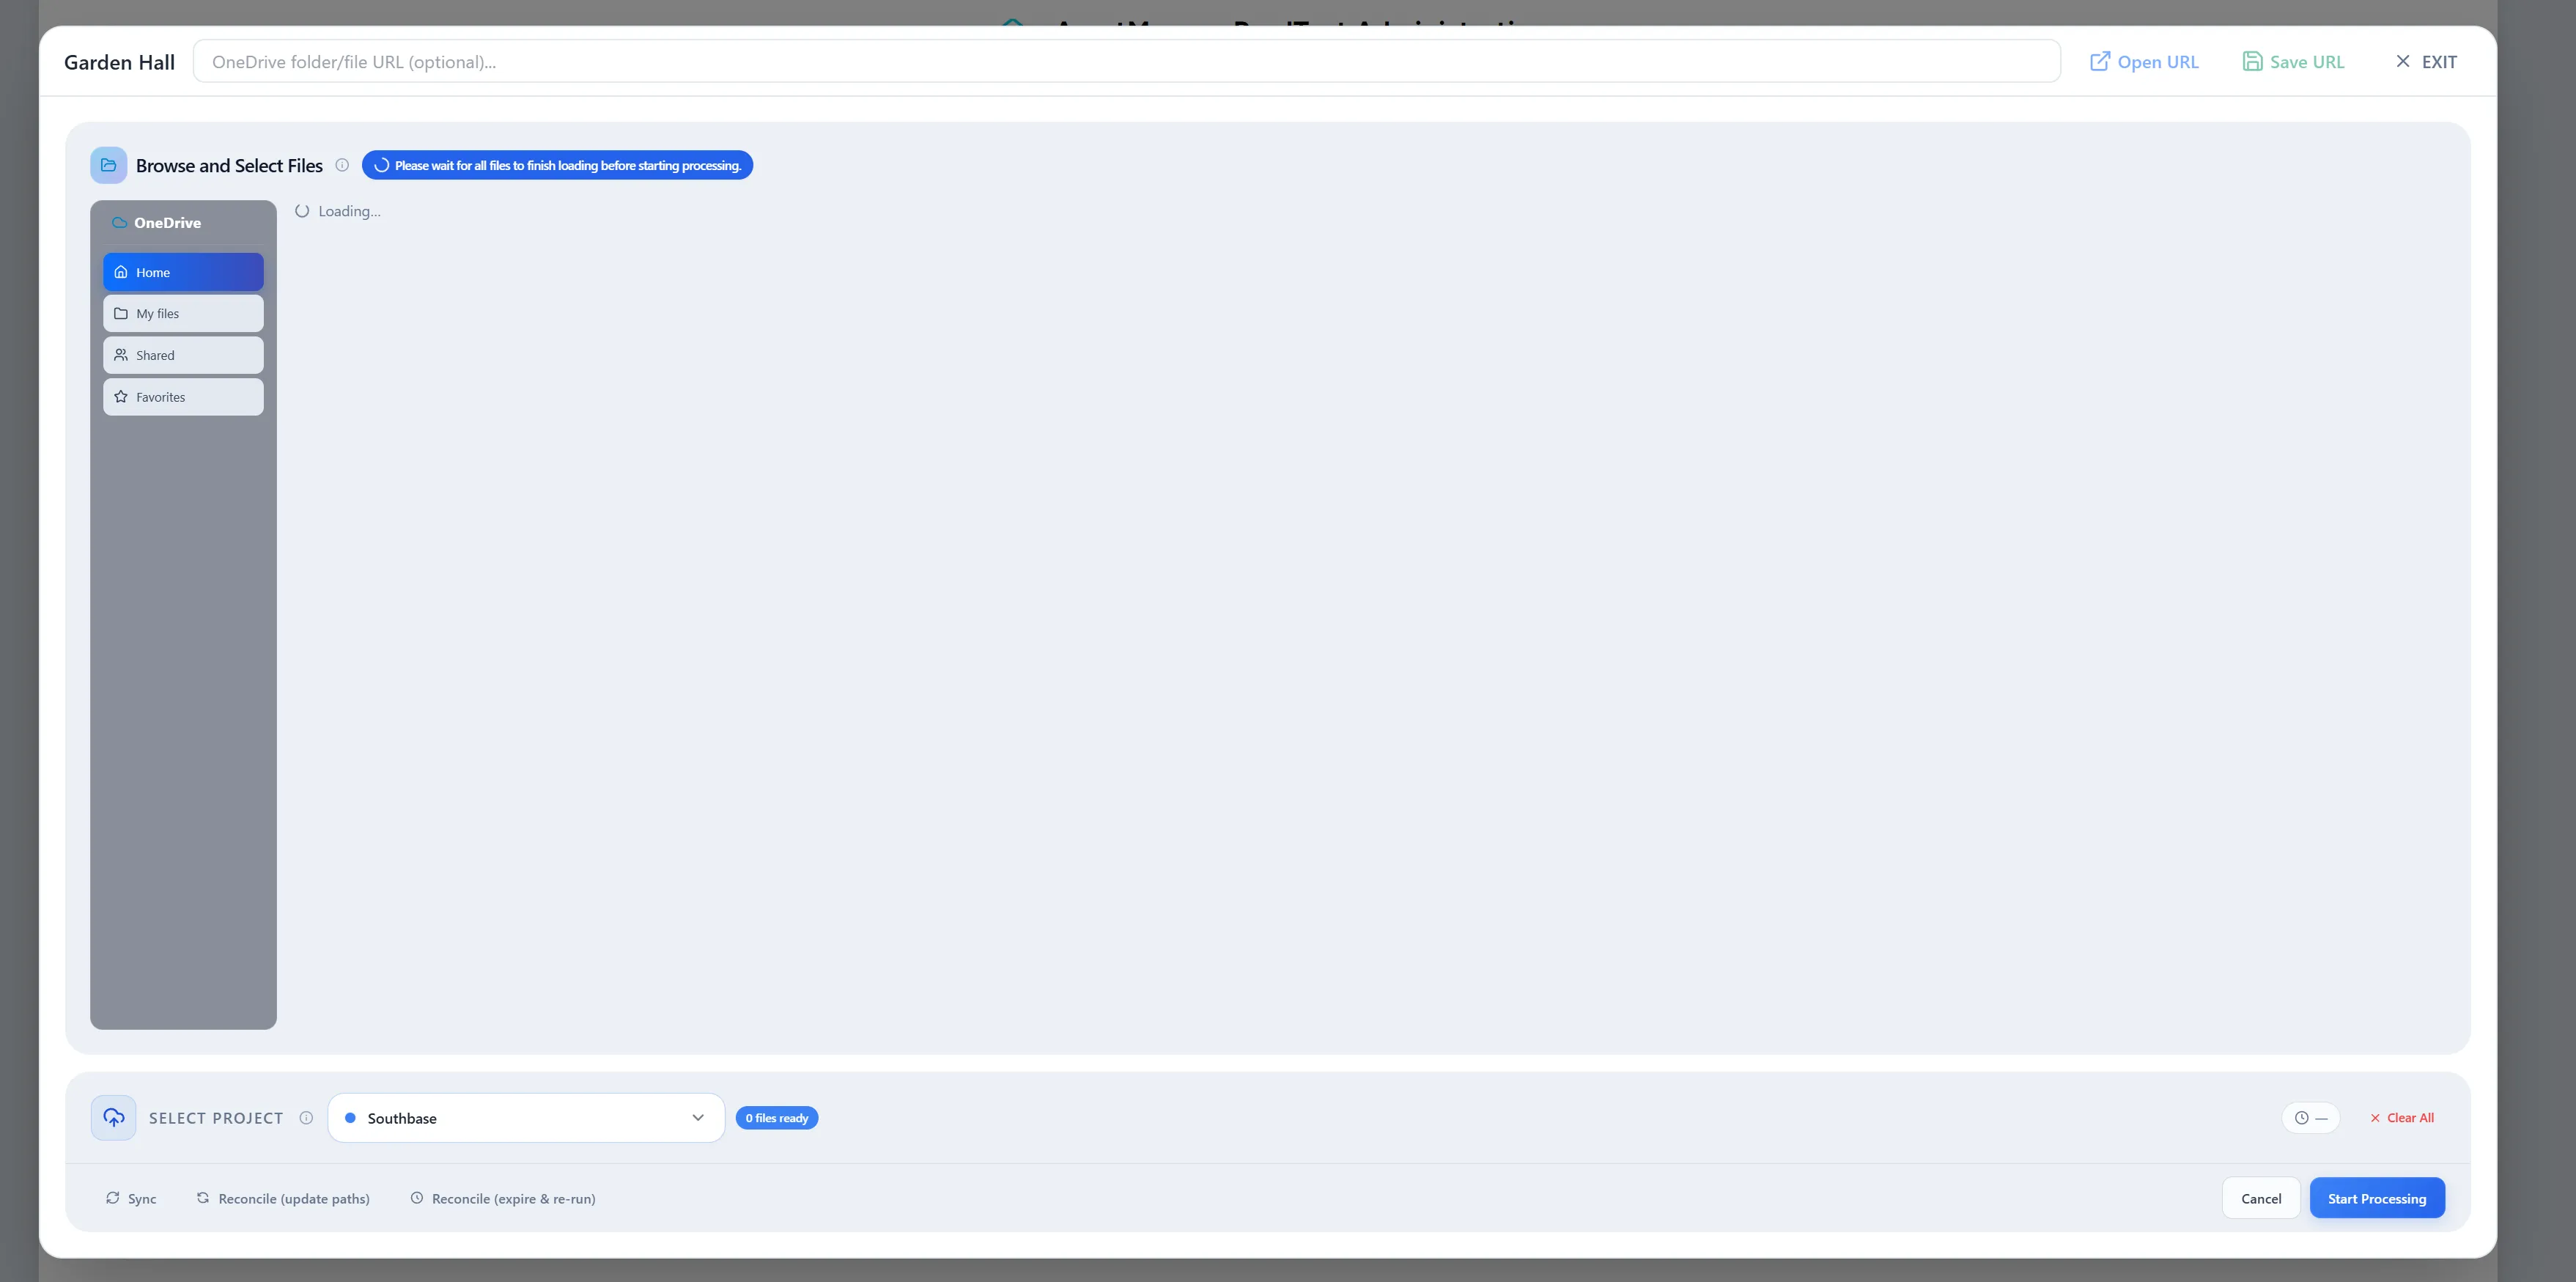
The OneDrive browse modal includes a left sidebar with navigation sections.
Step 1: Optional — Set a Scope URL
Section titled “Step 1: Optional — Set a Scope URL”- In the OneDrive URL input at the top, paste a OneDrive folder URL (e.g. from the OneDrive web app)
- Click Open URL to navigate directly to that folder
- Click Save URL to persist it — the connector will default to this folder on next open
Step 2: Choose a Browse Section (Left Sidebar)
Section titled “Step 2: Choose a Browse Section (Left Sidebar)”The left sidebar lists four sections. Click any section to switch the file tree:
| Section | What It Shows |
|---|---|
| Home | OneDrive home view — recommended starting point |
| My files | All files and folders in the signed-in user’s OneDrive |
| Shared | Files and folders shared with you or by you |
| Favorites | Files you have starred/favourited |
Switching section resets the current selection and folder expansion state.
Step 3: Shared Section Filters
Section titled “Step 3: Shared Section Filters”When the Shared section is active, two additional filter rows appear:
- People filter: “Shared with you” / “Shared by you”
- Type filter: All / Folder / Word / Excel / PowerPoint / PDF
Use these to narrow down shared items before selecting.
Step 4: Browse and Select
Section titled “Step 4: Browse and Select”- Expand folders using the chevron arrow
- Check/uncheck files and folders as needed
- The header badge shows the running count of selected items
Browsing and Selecting Files — SharePoint
Section titled “Browsing and Selecting Files — SharePoint”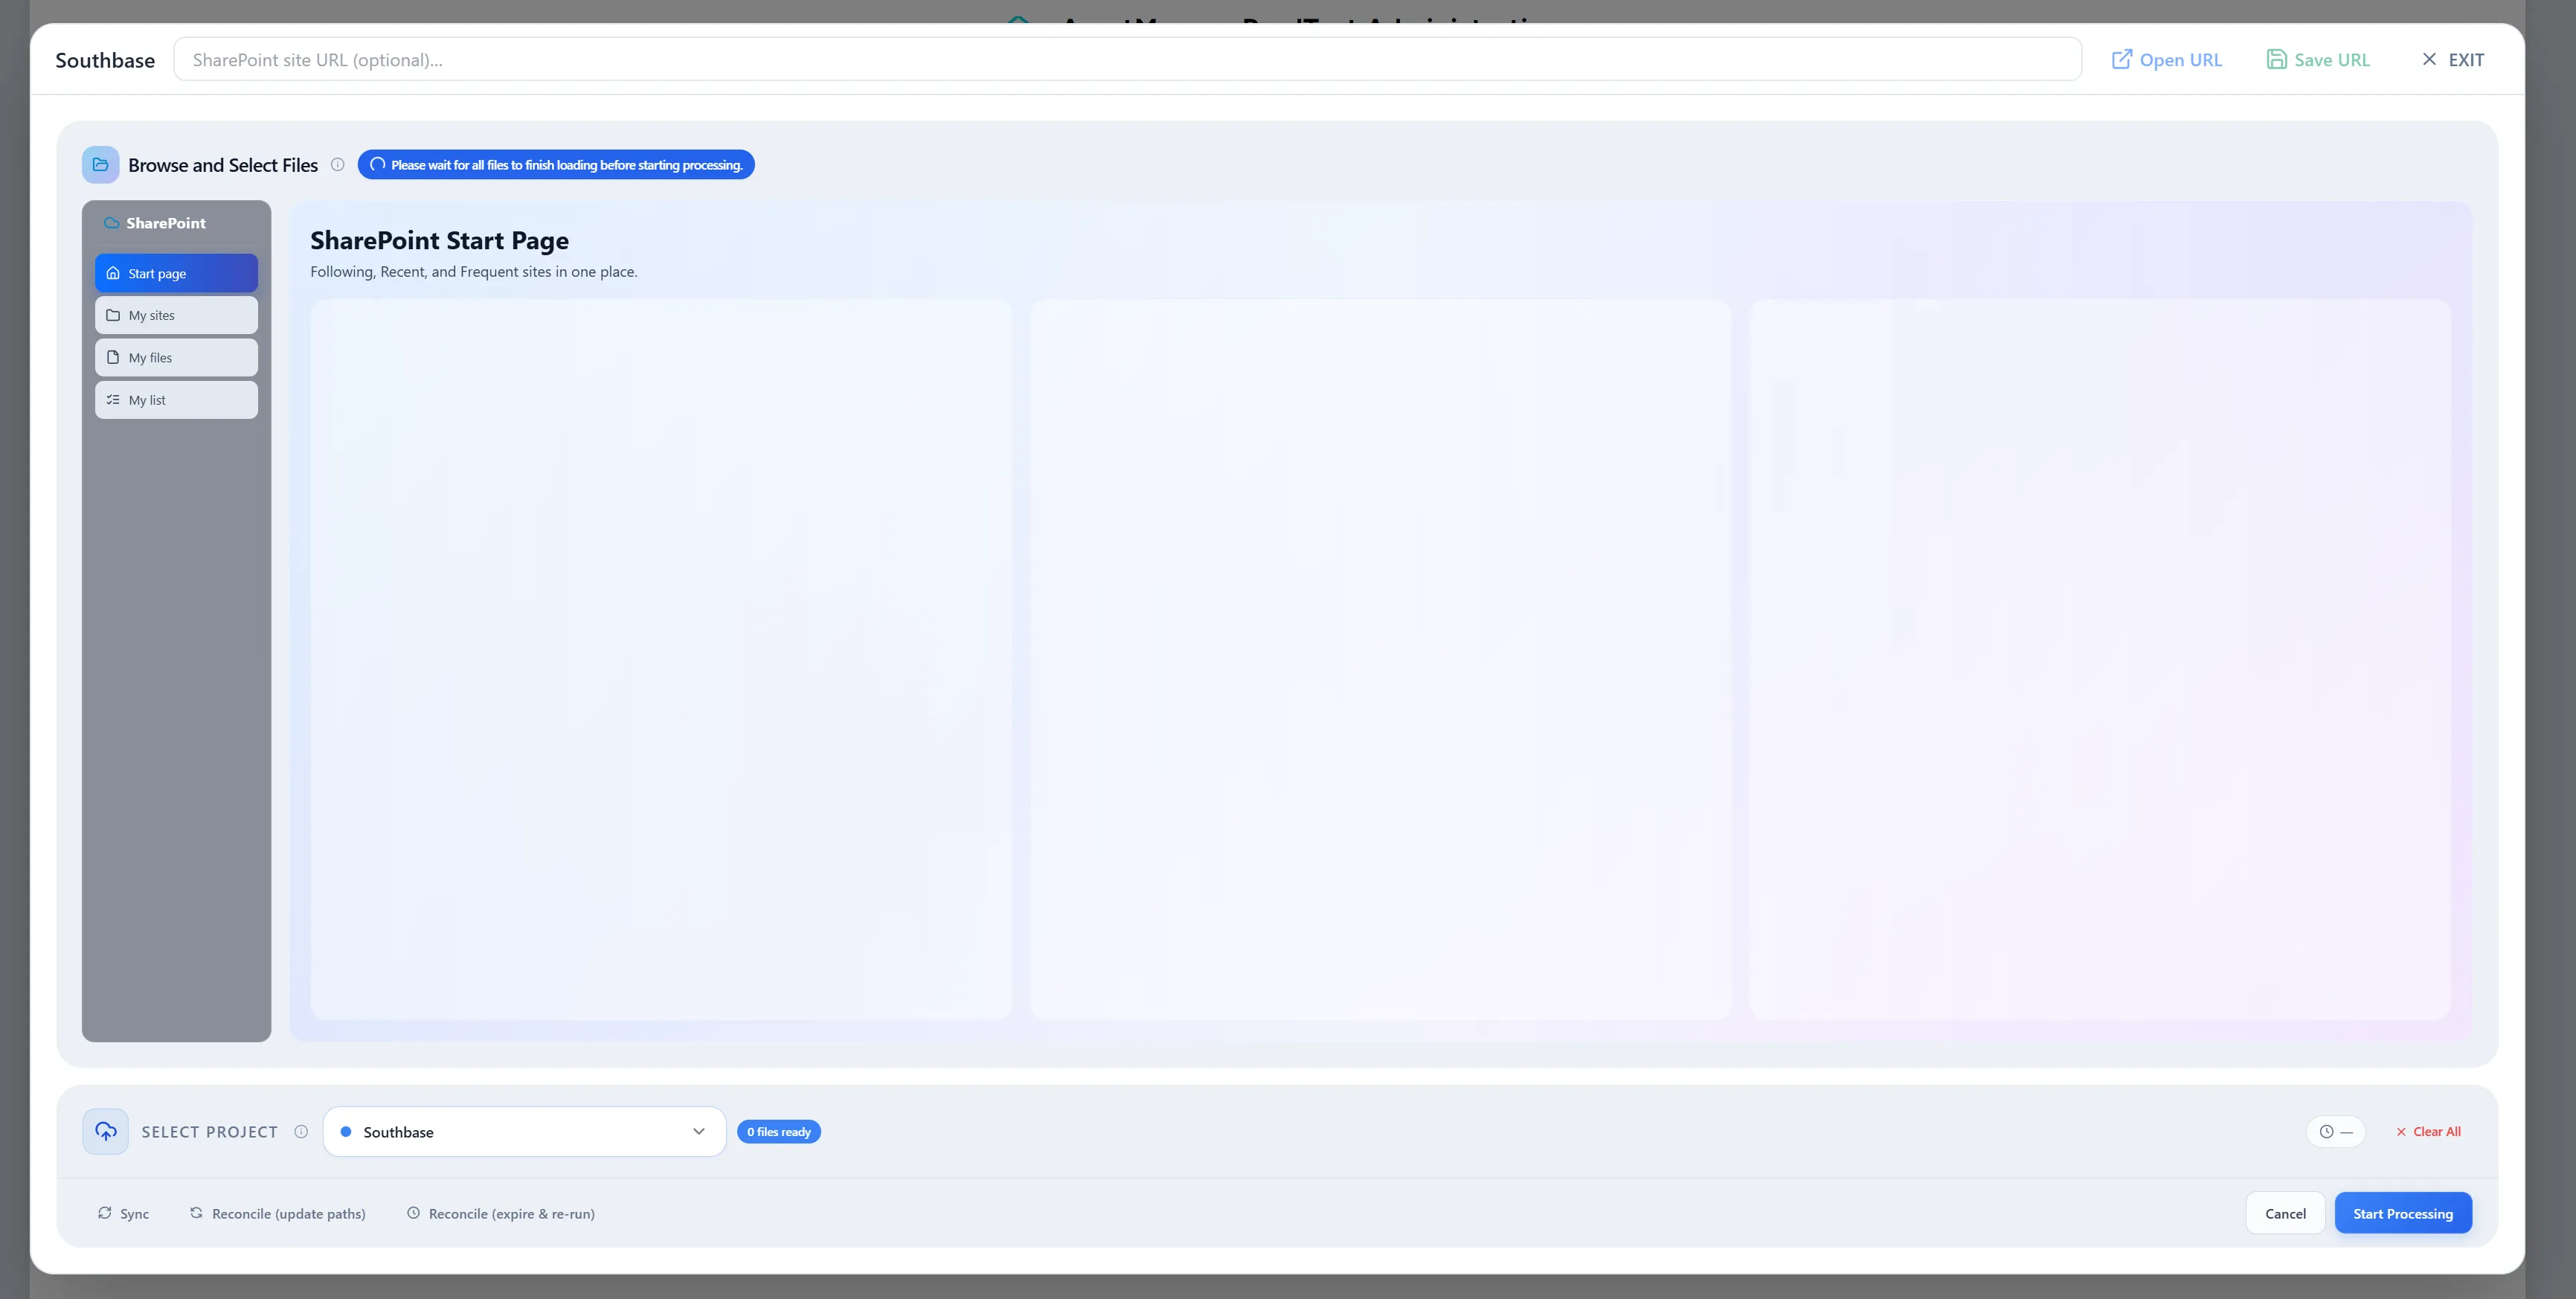
The SharePoint browse modal also includes a left sidebar and additional site-level navigation.
Step 1: Optional — Set a Site URL
Section titled “Step 1: Optional — Set a Site URL”- In the SharePoint site URL input at the top, paste a URL to a specific SharePoint site (e.g.
https://contoso.sharepoint.com/sites/Marketing) - Click Open URL to scope the tree to that site
- Click Save URL to persist it for future sessions
Removing the URL pill (click × next to the saved URL) resets the connector to browse all accessible sites.
Step 2: Choose a Browse Section (Left Sidebar)
Section titled “Step 2: Choose a Browse Section (Left Sidebar)”| Section | What It Shows |
|---|---|
| Start page | Sites and documents you follow, recently visited, and frequently used — the best starting point |
| My sites | All SharePoint sites you have access to |
| My files | Files in your personal OneDrive for Business within SharePoint |
| My list | SharePoint lists you have access to |
Switching section resets the current selection and folder expansion state.
Step 3: Start Page — Following, Recent, Frequent
Section titled “Step 3: Start Page — Following, Recent, Frequent”When Start page is active, three groups of cards appear:
- Following — Sites or documents you explicitly follow
- Recent — Recently visited sites and files
- Frequent — Sites and files you access most often
Click a site card on the Start page to navigate into that site’s document libraries. You can then expand library folders and select files.
Step 4: Browse and Select
Section titled “Step 4: Browse and Select”- Expand a site or library using the chevron arrow
- Check/uncheck folders and files
- Selected folders are processed recursively — you do not need to expand them first
- The header badge updates to confirm the selection count
Important: If a SharePoint folder shows in the tree but was not fully loaded, you may see an error when processing. Open the folder in the tree first, then try again.
Processing Selected Files
Section titled “Processing Selected Files”After selecting files or folders across any connector type:
Step 1: Assign to a Project
Section titled “Step 1: Assign to a Project”- Use the Project selector at the bottom of the modal to choose one or more projects this content should be indexed into
- All selected files are assigned to every checked project
Step 2: Click Process
Section titled “Step 2: Click Process”- Click the Process button (primary action button in the modal footer)
- The system validates your selection:
- At least one file or folder must be selected
- At least one project must be assigned
- If validation passes, the request is sent to the backend
Step 3: Watch the Progress Bar
Section titled “Step 3: Watch the Progress Bar”- A progress bar appears at the bottom of the modal
- The bar shows: files done / total files, estimated time remaining, and throughput (files/min)
- The bar turns green when all files complete successfully
- During processing the header shows: “Streaming, extracting text, and vectorising files. You can switch tabs or leave; check Background jobs to see progress.”
Tip: You can close the modal or navigate away immediately after clicking Process. The background workers continue running independently.
Background Jobs
Section titled “Background Jobs”What Are Background Jobs?
Section titled “What Are Background Jobs?”When you click Process, files are queued. Each worker:
- Streams the file from the source (Dropbox/OneDrive/SharePoint) — the file itself is never permanently stored
- Extracts text from the document (PDF, Word, Excel, etc.)
- Generates vector embeddings using the configured AI model
- Indexes the content into the database so it is searchable via AI chat
This is done asynchronously so the UI stays responsive. Large syncs with hundreds of files may take several minutes to complete. Jobs survive page navigation — they are tracked in both Redis (fast, 7-day TTL) and the database (persistent fallback).
Viewing the Background Jobs Panel
Section titled “Viewing the Background Jobs Panel”The background jobs panel can be accessed from the Connect to Source panel header.
Method 1: Background jobs button
Section titled “Method 1: Background jobs button”- Click the Background jobs button in the top-right corner of the Connect to Source panel
- The inline jobs panel expands below the panel header
- Click Hide background jobs to collapse it
Method 2: “View progress” badge
Section titled “Method 2: “View progress” badge”- If a job is currently running, an In Progress badge and a green View progress button appear in the panel header
- Click View progress to jump directly to the jobs panel

Panel Controls
Section titled “Panel Controls”| Control | Purpose |
|---|---|
| Active tab | Shows jobs currently running or queued |
| Completed tab | Shows finished (success, failed, cancelled) jobs |
| All Jobs tab | Shows every job regardless of status |
| Auto-refreshing | The list refreshes every 4 seconds automatically |
| Jobs continue running in the background | Footer reminder — closing the panel does not stop jobs |
Job Statuses Explained
Section titled “Job Statuses Explained”Each job card displays a colour-coded status:
| Status | Colour | Meaning |
|---|---|---|
| Processing | Blue (pulsing dot) | Worker is actively extracting and embedding files |
| Queued | Grey | Job has been accepted and is waiting for a worker to pick it up |
| Completed | Green | All files were processed successfully |
| Failed | Red | One or more files could not be processed; details available in the job panel |
| Cancelled | Amber | Job was cancelled by an admin before it completed |
Each card also shows:
- Connector display name
- Started at timestamp
- Duration (elapsed or total)
- Progress bar — files done vs total, with skipped and failed counts highlighted
Job Detail Panel
Section titled “Job Detail Panel”Click any job card to expand the detail panel below it.
The detail panel has tabbed sections:
Overview tab
Section titled “Overview tab”- Job ID (batch ID, useful for support)
- Connector name
- Duration and Started timestamp
- Error message (if status is Failed)
Files tab (when completed)
Section titled “Files tab (when completed)”- Created — number of new document records indexed
- Files processed — total file count handled
- Skipped — files skipped (duplicates, unsupported types, etc.)
- Failed files — list of files that errored with individual error messages
Progress tab (when active)
Section titled “Progress tab (when active)”- Live stage indicator: Preparing → Scanning → Processing → Done
- Current file being processed
- Files/min throughput and ETA
Cancelling a Job
Section titled “Cancelling a Job”- On any active job card, click the Cancel button (shown when the job is in Processing or Queued state)
- Confirm the cancellation if prompted
- The job status changes to Cancelled and all related Celery tasks are force-stopped via Redis signals
- Partial results are preserved — files that had already been indexed remain indexed
Cancel is irreversible. To re-process the same files, return to the browse modal, re-select the files, and click Process again.
Retrying Failed Items
Section titled “Retrying Failed Items”- Open a Failed job’s detail panel
- Switch to the Files tab
- A Retry Failed button appears listing the files that errored
- Click Retry Failed — the connector browse modal re-opens with those files pre-selected
- Click Process again to re-queue only the failed items
Troubleshooting
Section titled “Troubleshooting”Issue: Connector button shows “Connecting…” for a long time
Section titled “Issue: Connector button shows “Connecting…” for a long time”Solutions:
- The OAuth popup/redirect may have been blocked. Check your browser’s popup blocker
- Reload the page and try connecting again
- Ensure your Dropbox or Microsoft account has sufficient permissions
Issue: File tree shows “Failed to load” or stays empty
Section titled “Issue: File tree shows “Failed to load” or stays empty”Solutions:
- Click the Refresh icon or reload the browse modal (click EXIT then re-open the connector)
- For Dropbox: verify the shared link is publicly accessible
- For SharePoint: ensure the saved site URL is correct and your account has read access
- Check your network connection
Issue: Process button is disabled
Section titled “Issue: Process button is disabled”Solutions:
- You must select at least one file or folder
- You must assign at least one project
- If the loading spinner is still spinning in the header, wait for the file count to finish calculating before processing
Issue: Job stuck in “Processing” for a very long time
Section titled “Issue: Job stuck in “Processing” for a very long time”Solutions:
- Check the Background jobs panel for the current stage and file count
- Large folders with hundreds of files may take 10–20+ minutes
- Verify the Celery worker is running (check with your system administrator)
- If the job appears frozen with no progress for over 30 minutes, cancel it and re-process in smaller batches
Issue: Many files show as “Skipped”
Section titled “Issue: Many files show as “Skipped””Solutions:
- Skipped files are typically duplicates already indexed in the same project
- Files may also be skipped if they are an unsupported format (e.g. binary files, executables)
- If needed, remove the existing indexed version from the project first, then re-process
Issue: Background Jobs panel shows no jobs
Section titled “Issue: Background Jobs panel shows no jobs”Solutions:
- Jobs are stored with a 7-day TTL in Redis. Jobs older than seven days are no longer listed
- Ensure the Celery worker and Redis are running (contact your system administrator)
- If a job was running when the worker restarted, it will not reappear — re-process the files
Issue: SharePoint Start page shows no sites
Section titled “Issue: SharePoint Start page shows no sites”Solutions:
- Your account may not be following any SharePoint sites yet — try the My sites section instead
- Sign in to SharePoint directly and follow some sites, then return and refresh
- If the issue persists, paste the specific SharePoint site URL into the scope URL field and use Open URL