Main Chat Interface Procedure Guide
This procedure guide explains how to use the Main Chat Interface to compose and send messages, attach files, use voice input, configure agent roles, select projects, and interact with AI responses including citations and follow-up suggestions. The Main Chat Interface provides a unified system for all communication with the AI assistant.
Table of Contents
Section titled “Table of Contents”- Accessing the Main Chat Interface
- Understanding the Main Chat Interface
- Composing a New Message
- Attaching Files
- Using Drag and Drop
- Using Voice Input
- Configuring Agent Roles
- Selecting Projects
- Using Source with Files Mode
- Sending Messages and Loading States
- Understanding Message Format
- Working with Citations
- Using Next Suggestions
- Key Features Summary
- Best Practices
- Troubleshooting
- Security Notes
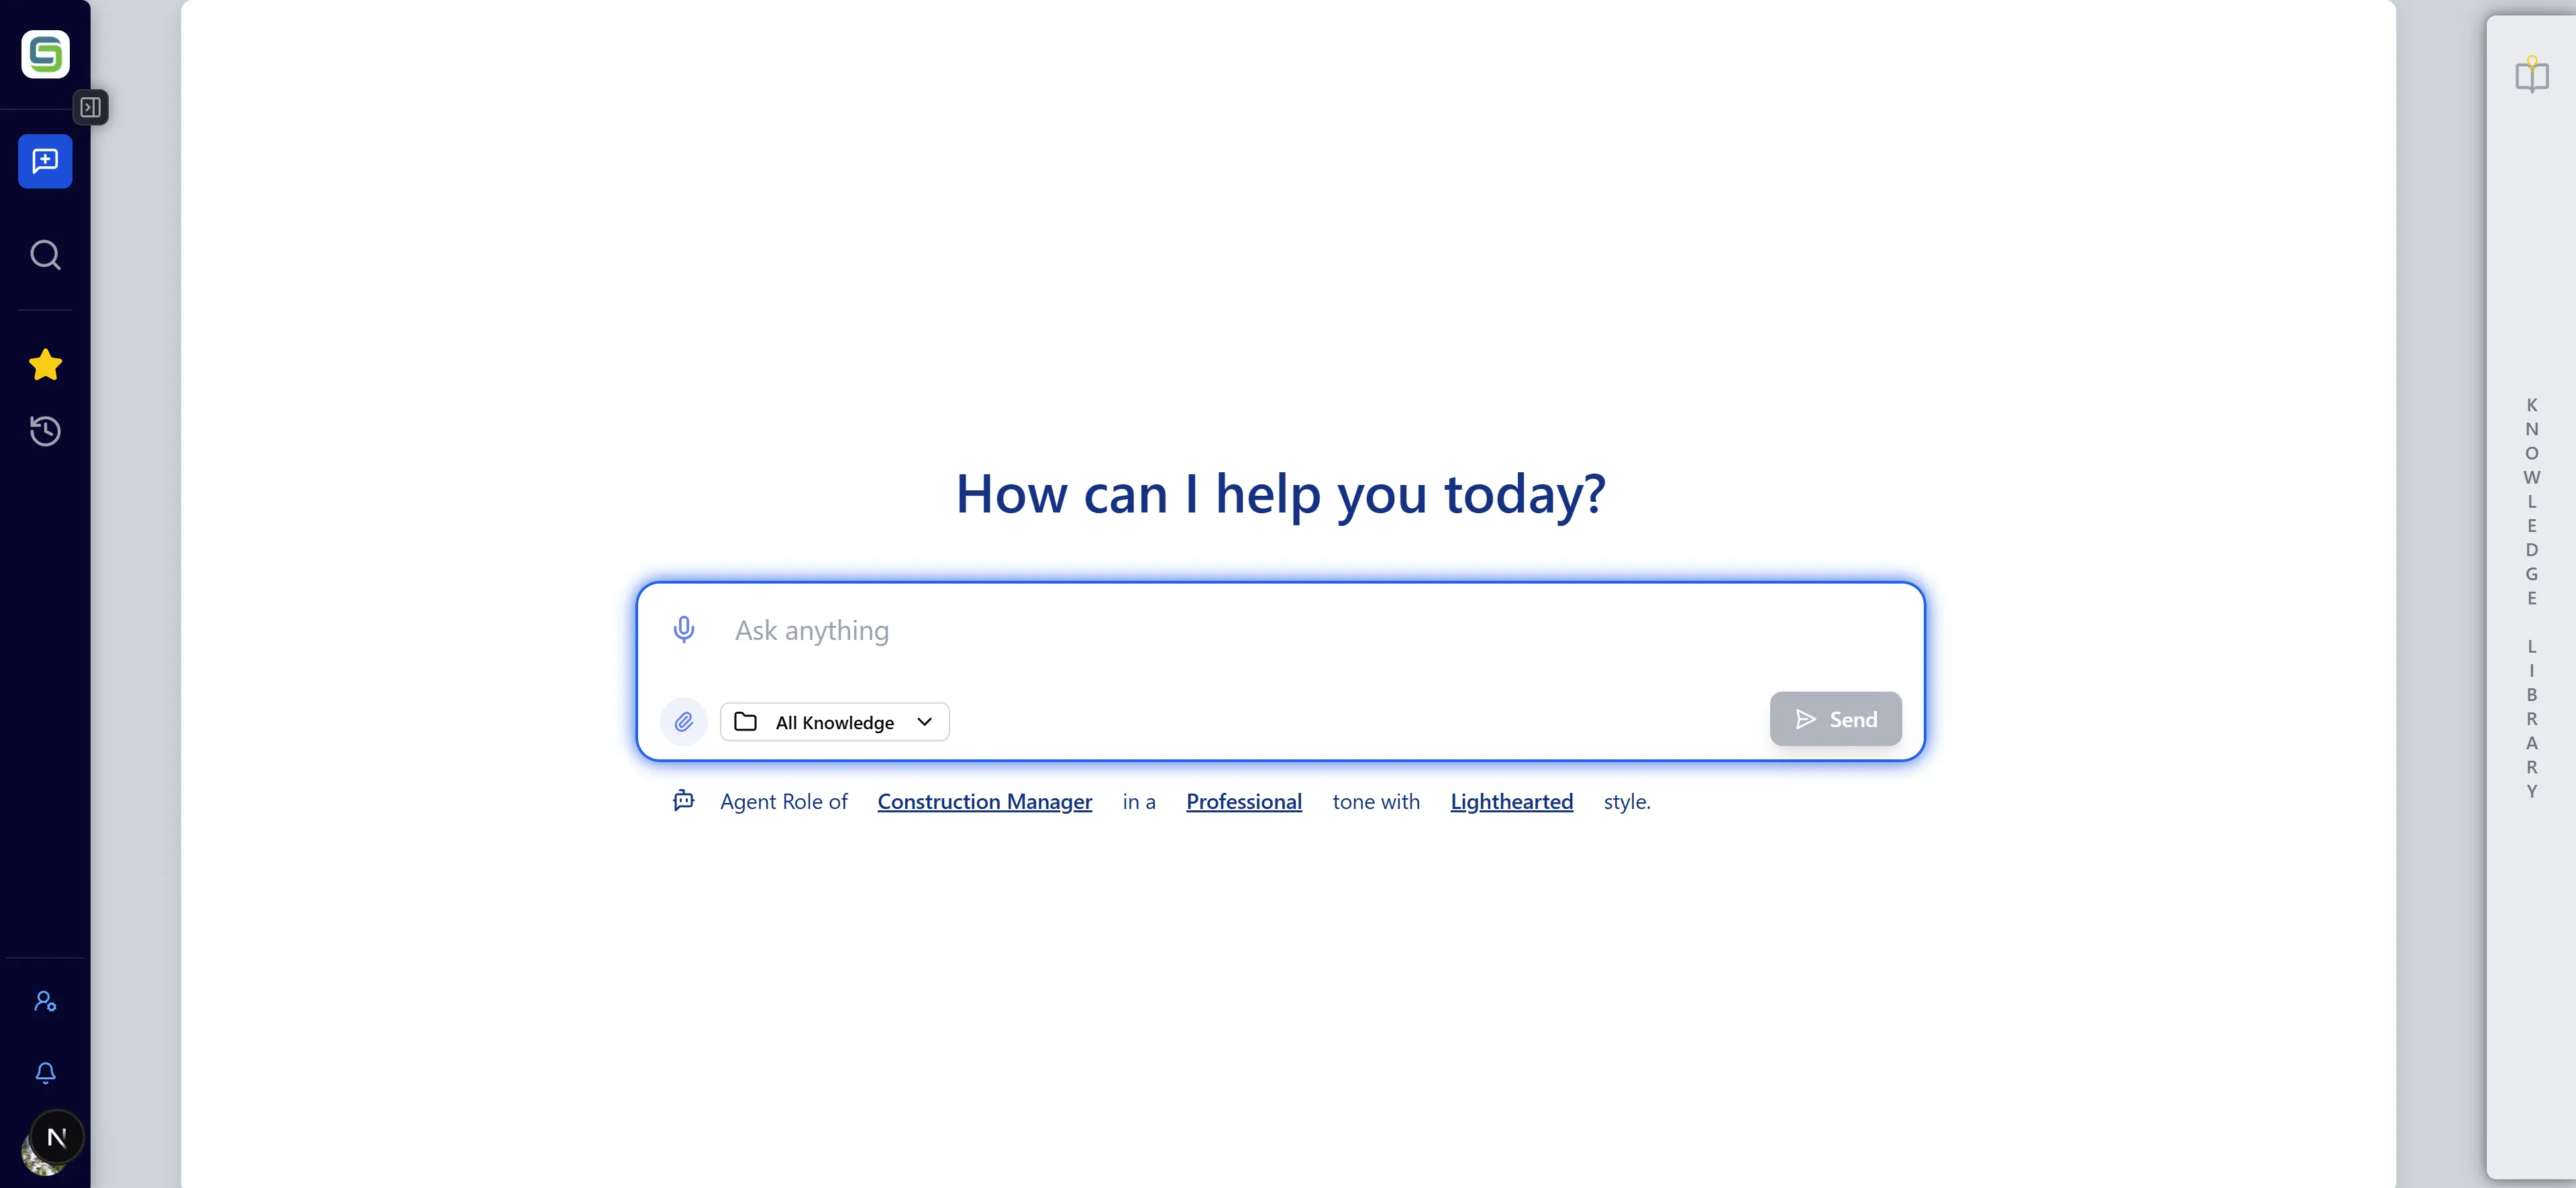
Accessing the Main Chat Interface
Section titled “Accessing the Main Chat Interface”Step 1: Locate the Chat Input Box
Section titled “Step 1: Locate the Chat Input Box”- Log in to the application
- Navigate to the Chat interface
- The Chat Input box appears in one of two locations:
- New Chat: Centered on the screen when no chat is selected or no messages exist
- Existing Chat: At the bottom of the chat panel when viewing an active conversation
Step 2: Understanding Input Box States
Section titled “Step 2: Understanding Input Box States”The Chat Input box adapts based on context:
-
New Chat State:
- Centered on screen
- Shows placeholder text: “Ask me anything…”
-
Active Chat State:
- Positioned at bottom of chat panel
- Shows placeholder text based on context
- Integrates with existing conversation
Understanding the Main Chat Interface
Section titled “Understanding the Main Chat Interface”Input Box Components
Section titled “Input Box Components”The Main Chat Interface consists of several key components:
- Text Area: Main input field for typing messages
- Character Counter: Shows character count (max 2000 characters)
- File Attachment Button: Paperclip icon (📎) for attaching files
- Voice Input Button: Microphone icon (🎤) for voice recording
- Send Button: Arrow icon (→) to send the message
- Agent Role Selector: Dropdown to configure AI role, tone, and style
- Project Selector: Dropdown to select projects for context
- Source Mode Toggle: Switch for controlling knowledge base usage (when files attached)
- File/Evidence Display: Shows attached files and knowledge library references
Visual Indicators
Section titled “Visual Indicators”- File Icons: Different icons for PDFs, images, documents, etc.
- Project Colors: Files and evidence color-coded by associated project
- Upload Status: Visual feedback during file upload
- Recording Indicator: Animated microphone icon during voice recording
- Character Limit Warning: Visual warning when approaching 2000 character limit
Composing a New Message
Section titled “Composing a New Message”Step 1: Start Typing
Section titled “Step 1: Start Typing”- Click in the text area of the Chat Input box
- Begin typing your message
- The input box will automatically expand as you type
- Character counter updates in real-time
Attaching Files
Section titled “Attaching Files”Step 1: Access File Attachment
Section titled “Step 1: Access File Attachment”- Locate the paperclip icon (📎) in the Chat Input box
- Click the paperclip icon to open the file picker
- Alternatively, use drag and drop (see Using Drag and Drop)

Step 2: Select Files
Section titled “Step 2: Select Files”- The file picker dialog opens
- Navigate to the files you want to attach
- Select multiple files by holding Ctrl (Windows) or Cmd (Mac) while clicking
- Supported file types include:
- PDF documents (.pdf)
- Word documents (.docx, .doc)
- Text files (.txt)
- Images (.jpg, .png, .gif, etc.)
- Excel files (.xlsx, .xls)
- And more
Step 3: View Attached Files
Section titled “Step 3: View Attached Files”- After selection, files appear as file bubbles above the text input
- Each file shows:
- File name
- File type icon
- Project color (if associated with a project)
- Remove button (X)
- Maximum 4 items total (files + knowledge library references combined)
- If you exceed the limit, an alert message appears
Step 4: Remove Attached Files
Section titled “Step 4: Remove Attached Files”- Hover over a file bubble to see the remove button
- Click the X button to remove the file
- The file is immediately removed from the attachment list
- You can add a different file if needed
Step 5: File Upload Behavior
Section titled “Step 5: File Upload Behavior”When you send a message with files:
- Files are uploaded to the server
- Upload acknowledgment messages appear in the chat
- Files become available for the AI to reference
- If identical files already exist, a reuse message appears
- Files are associated with the current chat session
Using Drag and Drop
Section titled “Using Drag and Drop”Step 1: Drag Files from File System
Section titled “Step 1: Drag Files from File System”- Open your file explorer (Windows Explorer, Finder, etc.)
- Select one or more files you want to attach
- Drag the files over the Chat Input box area
- The input box shows a visual indicator (highlighted border) when files are dragged over it
- Release the mouse to drop the files
Step 2: Drag Evidence from Knowledge Library
Section titled “Step 2: Drag Evidence from Knowledge Library”- Open the Knowledge Library (right sidebar)
- Locate the document you want to reference
- Click and drag the document card
- Drag it over the Chat Input box
- The input box shows a visual indicator
- Release to drop the evidence reference
Step 3: Understanding Drop Behavior
Section titled “Step 3: Understanding Drop Behavior”When dropping items:
- Files from file system: Added as uploaded files (yellow styling)
- Evidence from library: Added as evidence references (project-colored styling)
- Combined limit: Maximum 4 items total (files + evidence)
- Automatic project selection: Dropping evidence may auto-select associated projects
Step 4: Visual Feedback
Section titled “Step 4: Visual Feedback”During drag and drop:
- Drag Over State: Input box border highlights
- File Count: Shows how many files are being dragged
- Drop Zone: Clear visual indication of drop target
- Error Messages: Alerts if limit exceeded or invalid file type
Using Voice Input
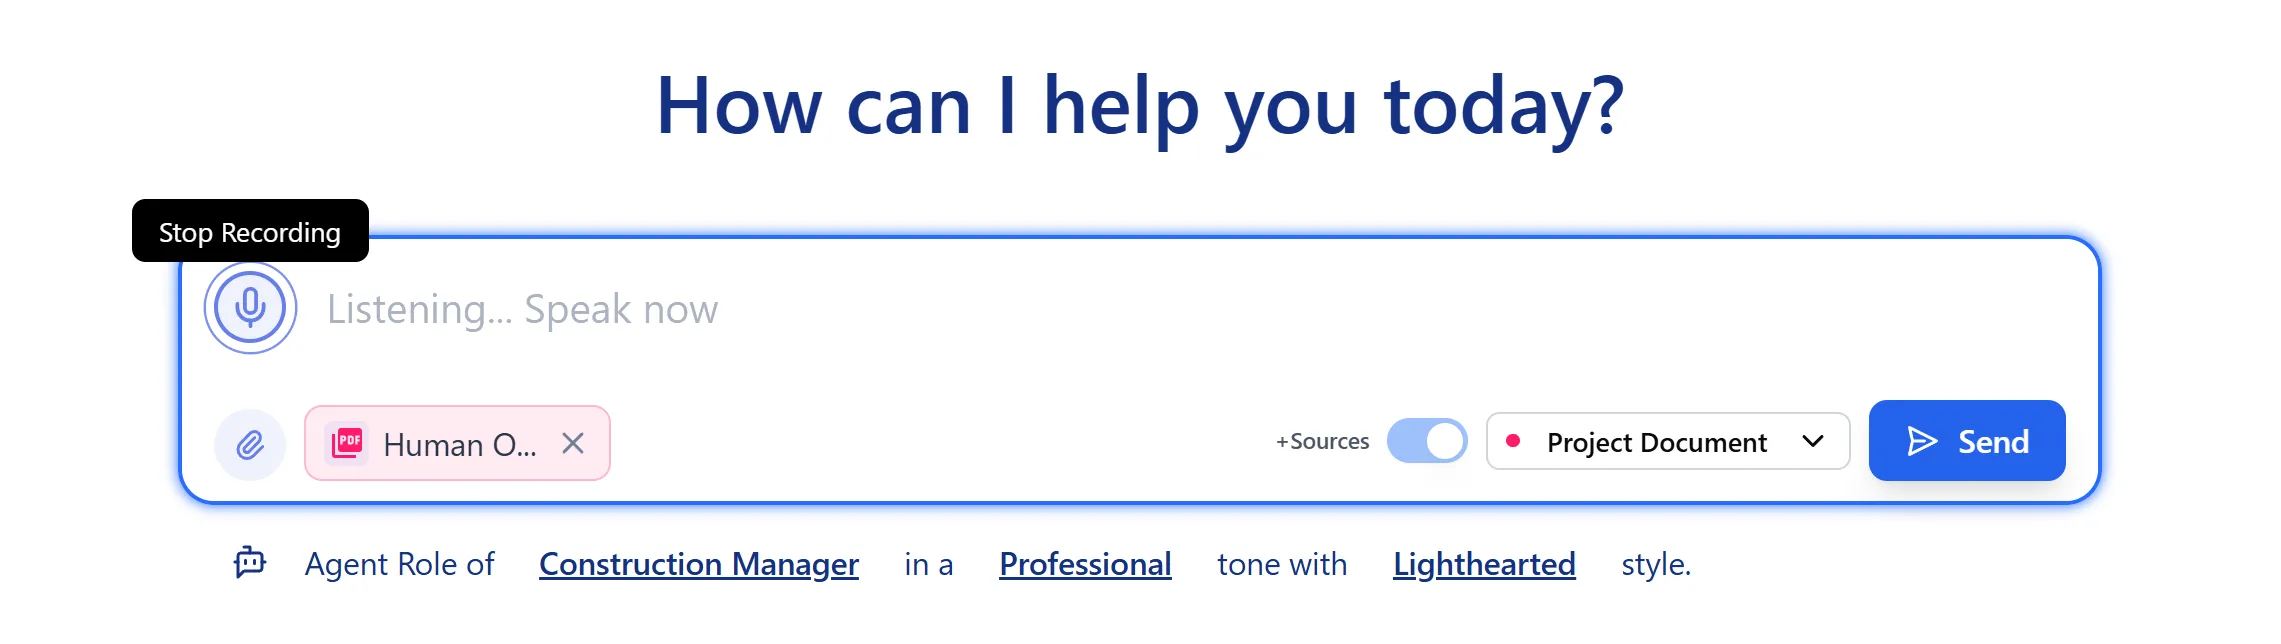
Section titled “Using Voice Input”Step 1: Access Voice Recording
Section titled “Step 1: Access Voice Recording”- Locate the microphone icon (🎤) in the Chat Input box
- Click the microphone icon to start recording
- The icon changes to indicate recording state
Step 2: Grant Microphone Permission
Section titled “Step 2: Grant Microphone Permission”First Time Use:
- Browser will prompt for microphone permission
- Click “Allow” to grant access
- If denied, follow browser-specific instructions to enable
Permission States:
- Granted: Recording starts immediately
- Prompt: Browser asks for permission
- Denied: Error message appears with instructions
Step 3: Record Your Message
Section titled “Step 3: Record Your Message”- Click the microphone to start recording
- Speak clearly into your microphone
- Visual feedback shows:
- Animated microphone icon
- “Recording…” status message
- Real-time transcript appears in text area
- Auto-stop: Recording stops after 2.5 seconds of silence
- Manual stop: Click microphone again to stop recording
Step 5: Handle Errors
Section titled “Step 5: Handle Errors”If voice recording fails:
-
Permission Denied:
- Error message appears
- Click “Grant Permission” button if available
- Follow browser settings to enable microphone
-
No Microphone:
- Error message indicates no microphone detected
- Use text input instead
-
Recording Failed:
- Try clicking microphone again
- Check microphone connection
- Verify browser permissions
Configuring Agent Roles
Section titled “Configuring Agent Roles”Step 1: Access Role Selector
Section titled “Step 1: Access Role Selector”- Locate the Agent Role indicator below the Chat Input box
- Shows format: “Agent Role of [Role Name]”
- Click on the underlined role name to open dropdown
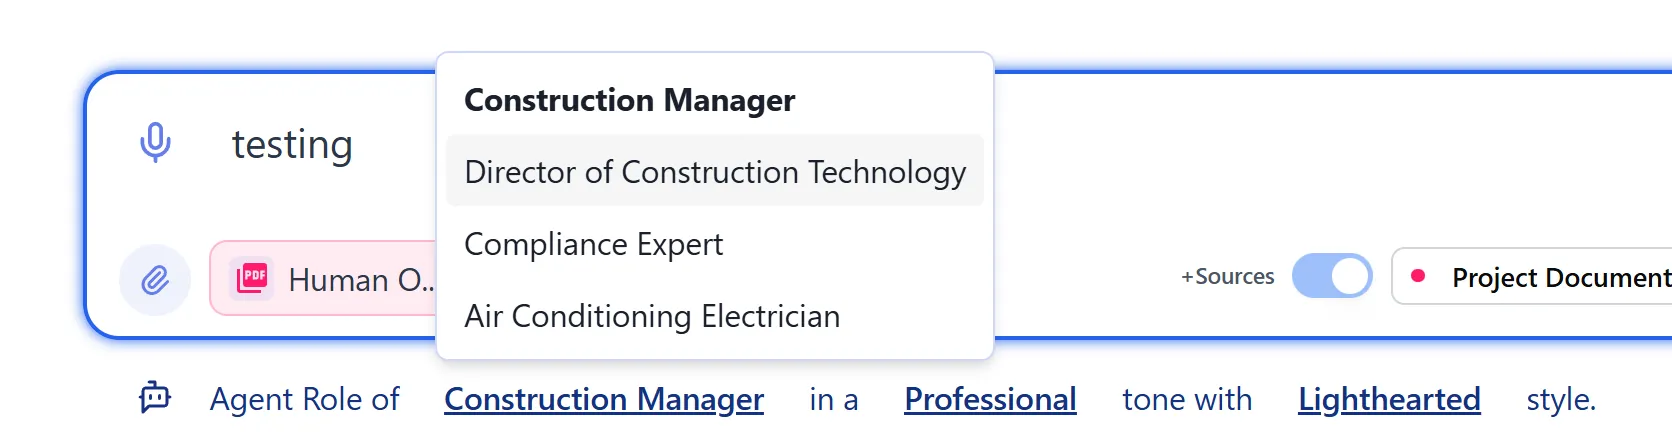
Step 2: Select Agent Role
Section titled “Step 2: Select Agent Role”- Role Dropdown opens showing available roles:
- Director of Construction Technology
- Construction Manager
- Project Manager
- Site Engineer
- And more…
- Click a role to select it
- The role updates immediately
- Role affects how the AI responds to your messages
Step 3: Configure Tone
Section titled “Step 3: Configure Tone”- After selecting role, configure Tone:
- Professional: Formal, business-like communication
- Casual: Relaxed, conversational communication
- Tone affects the style of AI responses
- Selected tone persists for the chat session
Step 4: Configure Style
Section titled “Step 4: Configure Style”- Configure Communication Style:
- Serious: Formal and direct
- Reserved: Cautious and measured
- Balanced: Moderate approach
- Lighthearted: Friendly and approachable
- Humorous: Playful and entertaining
- Style affects the personality of AI responses
- Selected style persists for the chat session
Step 5: Understanding Role Impact
Section titled “Step 5: Understanding Role Impact”The selected role, tone, and style:
- Affect AI responses: Responses match your selected configuration
- Persist per chat: Settings saved for each chat session
- Sync with profile: Defaults from your profile settings
- Can be changed: Update anytime during conversation
Selecting Projects
Section titled “Selecting Projects”Step 1: Access Project Selector
Section titled “Step 1: Access Project Selector”- Locate the Project Selector in the Chat Input area
- Shows current project selection or “All Knowledge”
- Click to open project dropdown
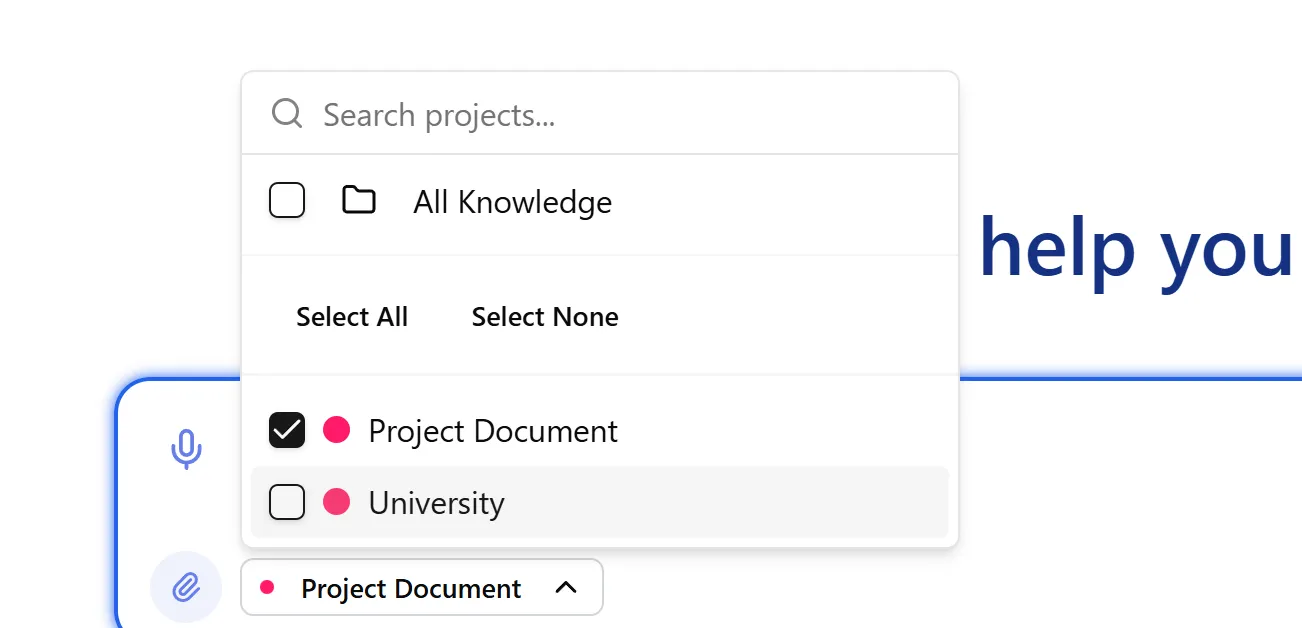
Step 2: Select Projects
Section titled “Step 2: Select Projects”- Project Dropdown opens showing:
- Available projects (with color indicators)
- “All Knowledge” option (no project filter)
- Select one or more projects:
- Click to select/deselect projects
- Multiple projects can be selected
- Selected projects show checkmarks
- “All Knowledge” option:
- Shows all documents across all projects
- No project filtering applied
Step 3: Understanding Project Selection Impact
Section titled “Step 3: Understanding Project Selection Impact”Selected projects affect:
- Document Access: AI can reference documents from selected projects
- Knowledge Base: Search limited to selected projects
- Chat Context: Conversation focused on selected projects
- Evidence References: Dropping evidence may auto-select associated projects
Step 4: Project Selection Behavior
Section titled “Step 4: Project Selection Behavior”- Auto-selection: Dropping evidence may auto-select its project
- Multiple Projects: Can select multiple projects for cross-project queries
- All Knowledge: Selecting “All Knowledge” clears project filters
- Visual Indicators: Selected projects show in project selector
Using Source with Files Mode
Section titled “Using Source with Files Mode”Step 1: Attach Files First
Section titled “Step 1: Attach Files First”- Attach one or more files using file attachment or drag and drop
- Files appear as file bubbles above the input
- Source Mode Toggle appears when files are attached

Step 2: Understand Source Modes
Section titled “Step 2: Understand Source Modes”When files are attached, you have two modes:
-
“No Source” Mode (default):
- AI uses only the attached files
- Ignores general knowledge base
- Focuses exclusively on uploaded content
-
“+Source” Mode (Source with Knowledge):
- AI uses general knowledge base
- Files are available but not exclusively used
- AI can reference other documents
Step 3: Toggle Source Mode
Section titled “Step 3: Toggle Source Mode”- Locate the toggle switch near attached files
- Toggle to “+Source” to enable Source with Knowledge mode
- Toggle shows current mode state
- Mode applies to the next message sent
Step 4: When to Use Source Mode
Section titled “Step 4: When to Use Source Mode”Use “+Source” mode when:
- You want AI to use general knowledge
- You want AI to reference other documents
- Files are supplementary to your question
Use “No Source” mode when:
- You want AI to focus only on specific uploaded files
- You need analysis of particular documents
- You want to exclude general knowledge base
- You’re working with confidential or project-specific documents
Sending Messages and Loading States
Section titled “Sending Messages and Loading States”Step 1: Send a Message
Section titled “Step 1: Send a Message”- Compose your message in the text input
- Optionally attach files or evidence references
- Configure agent role, tone, and style if needed
- Select projects for context if desired
- Click the Send button (→) or press Enter
Step 2: Immediate Loading State
Section titled “Step 2: Immediate Loading State”After sending:
- Message appears immediately in chat
- Input box clears and becomes disabled
- Loading indicator appears showing:
- “Processing…” message
- Progress stages (if applicable)
- Elapsed time counter
- Pending message state shows in chat
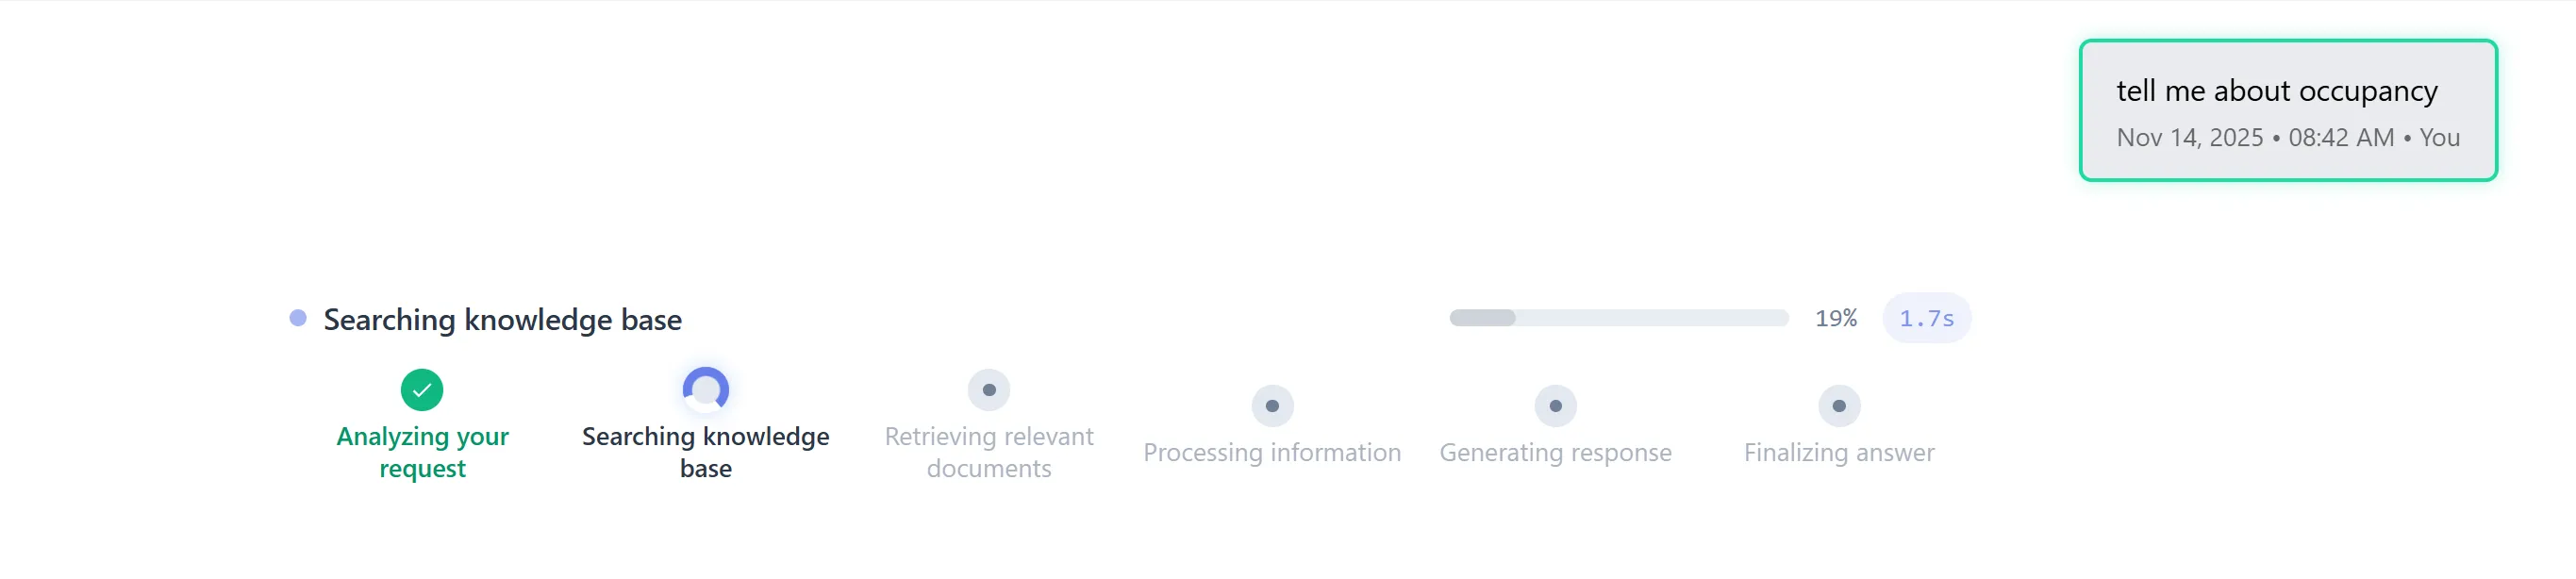
Step 3: Processing Stages
Section titled “Step 3: Processing Stages”The loading indicator shows processing stages:
- Processing Request: Initial request processing
- Searching Knowledge Base: Finding relevant documents
- Generating Response: AI generating answer
- Formatting Response: Preparing final response
- Complete: Response ready
Step 4: Response Arrival
Section titled “Step 4: Response Arrival”When response arrives:
- Pending message updates with AI response
- Citations appear (if any) as numbered references
- Follow-up suggestions appear below response
- Input box re-enables for next message
- Character counter resets
Step 5: Error Handling
Section titled “Step 5: Error Handling”If sending fails:
- Error message appears in chat
- Input box re-enables immediately
- Your message is preserved (not lost)
- Retry sending when ready
- Check network connection if errors persist
Understanding Message Format
Section titled “Understanding Message Format”Step 1: User Message Format
Section titled “Step 1: User Message Format”User messages appear as:
- Text content: Your typed or voice-transcribed message
- Attached files: File bubbles showing attached documents
- Evidence references: Knowledge library items you referenced
- Project context: Selected projects (shown in message metadata)
- Timestamp: When message was sent
Step 2: AI Response Format
Section titled “Step 2: AI Response Format”AI responses include:
- Response text: Main answer or information
- Citations: Numbered references to source documents
- File attachments: Documents referenced in response
- Role/Tone/Style tags: Shows AI configuration used
- Follow-up suggestions: Next question recommendations
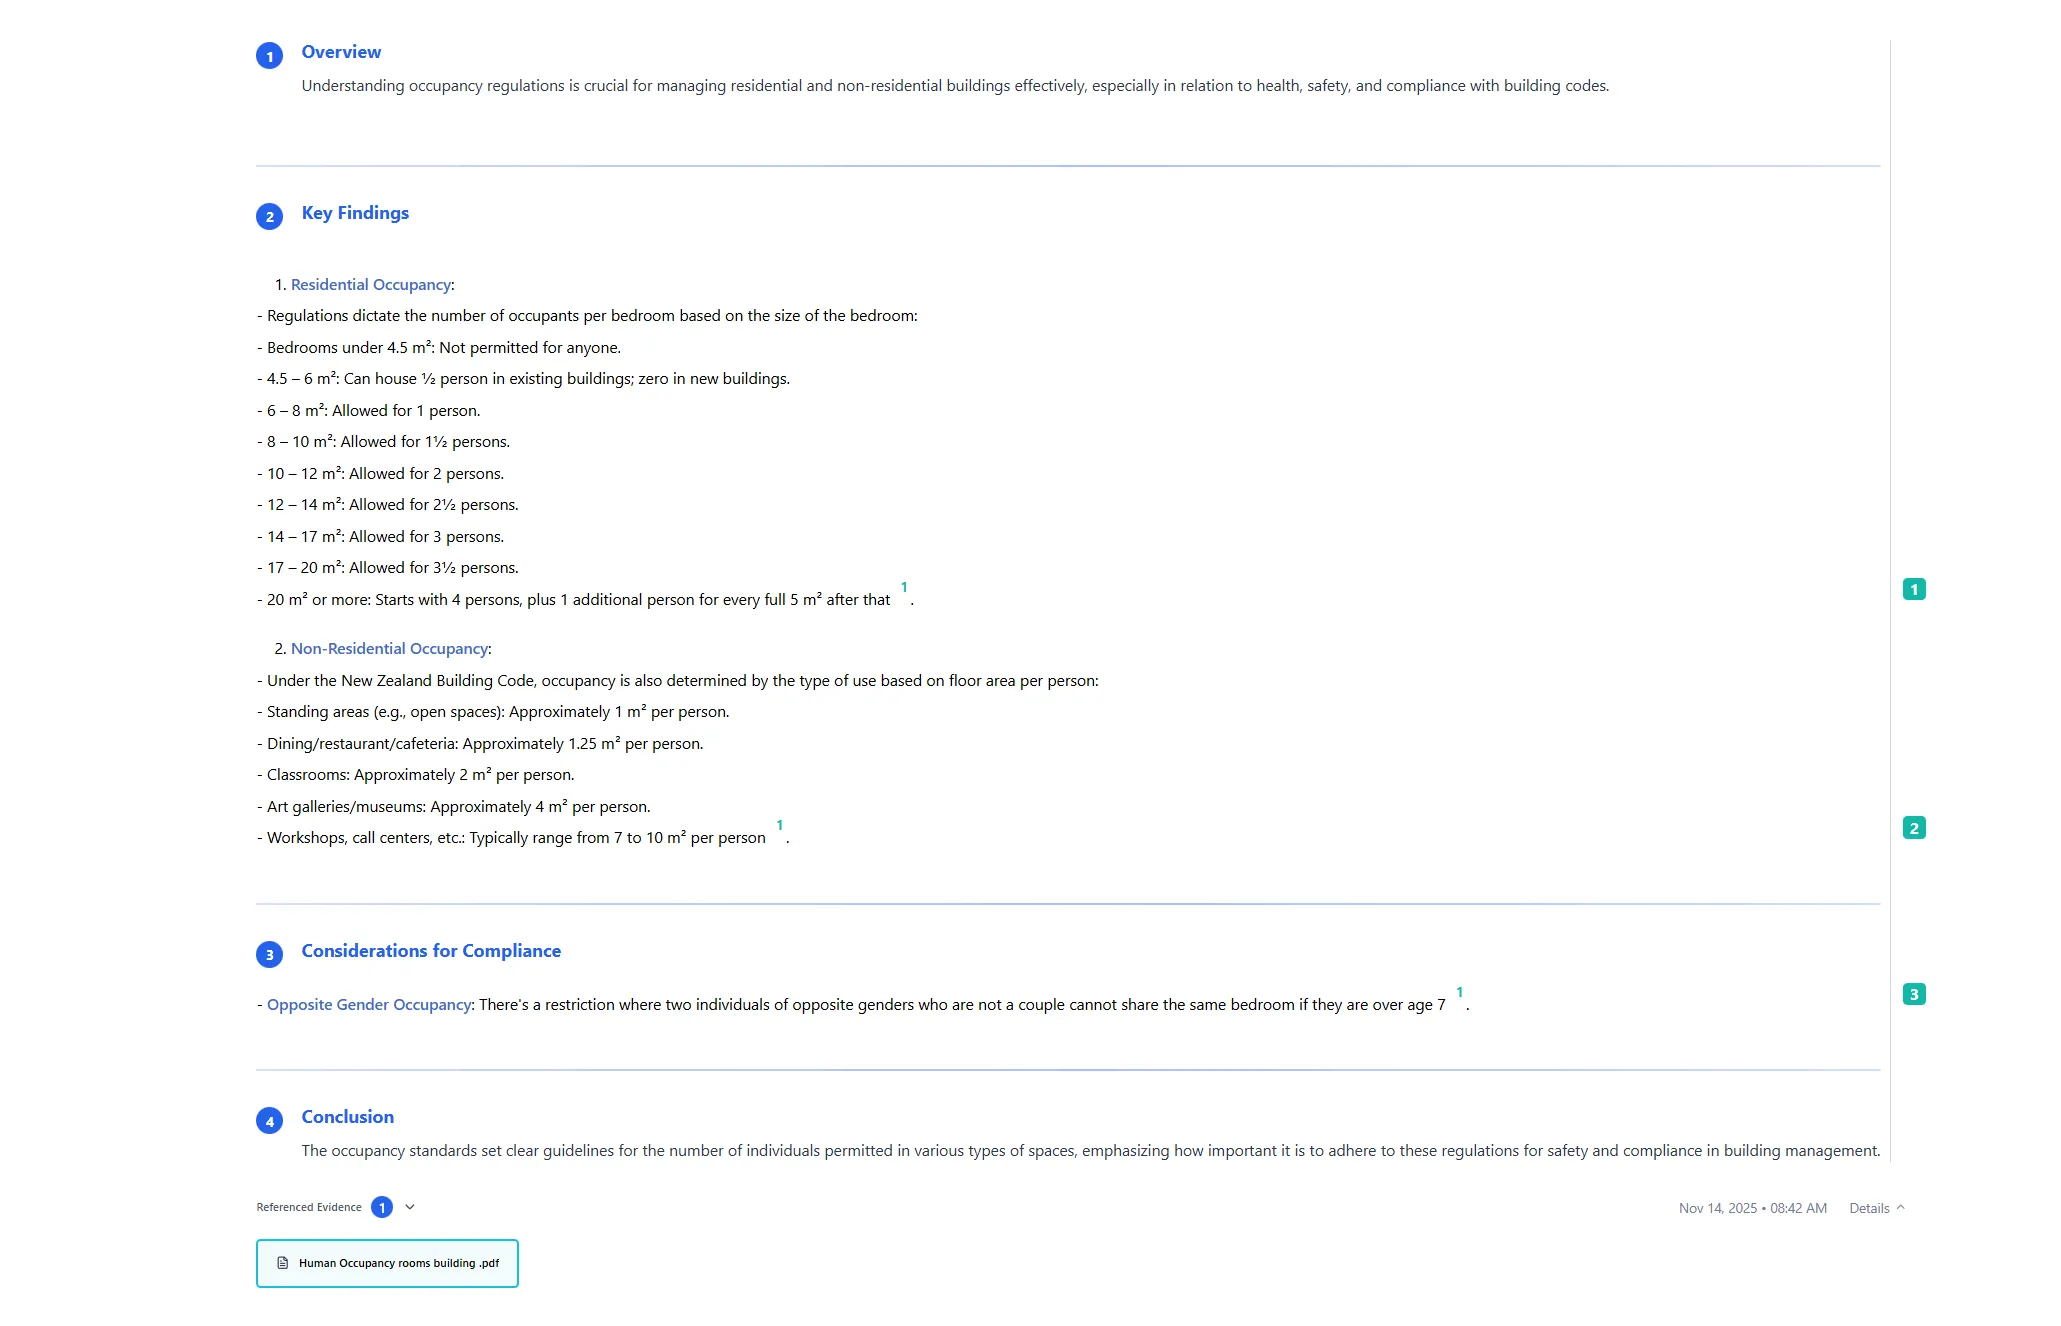
Step 3: Citation Markers in Text
Section titled “Step 3: Citation Markers in Text”Citations appear as:
- Superscript numbers: Like [1], [2], [3] in the text
- Clickable: Click to view source document
- Tooltips: Hover to see document name and page
- Inline references: Integrated naturally in response text
Step 4: Message Metadata
Section titled “Step 4: Message Metadata”Each message shows:
- Timestamp: When sent/received
- Status: Pending, complete, or error
- Processing time: How long response took
- Context: Project associations
- Tags: Role, tone, style indicators
Working with Citations
Section titled “Working with Citations”Step 1: Understanding Citations
Section titled “Step 1: Understanding Citations”Citations are references to source documents used in AI responses:
- Numbered references: [1], [2], [3] appear in response text
- Source documents: Link to specific documents in knowledge base
- Page numbers: Reference specific pages when available
- Highlighted text: Shows quoted or referenced content
Step 2: View Citation Details
Section titled “Step 2: View Citation Details”- Hover over a citation number (e.g., [1])
- Tooltip appears showing:
- Document filename
- Page number (if available)
- “Click to view” instruction
- Tooltip stays visible while hovering
Step 3: Open Citation Source
Section titled “Step 3: Open Citation Source”- Click a citation number in the response
- Document Modal opens showing:
- Full document viewer
- Citation highlighted on specific page
- Navigation to other citations
- Document metadata
- Navigate citations: Use citation sidebar to jump between references
Step 4: Navigate Multiple Citations
Section titled “Step 4: Navigate Multiple Citations”When multiple citations exist:
- Citation sidebar shows all citations
- Click any citation to jump to that reference
- Highlighted sections show quoted content
- Page navigation jumps to cited pages
- Close modal to return to chat
Step 5: Citation Types
Section titled “Step 5: Citation Types”Citations can reference:
- Uploaded files: Documents you attached to the chat
- Knowledge library: Documents from knowledge base
- Bulk uploads: System-wide documents
- Project documents: Documents associated with selected projects
Using Next Suggestions
Section titled “Using Next Suggestions”Step 1: Understanding Follow-up Suggestions
Section titled “Step 1: Understanding Follow-up Suggestions”After AI responses, follow-up suggestions appear:
- Suggested questions: AI-generated relevant follow-ups
- Context-aware: Based on current conversation
- Clickable: Click to use as your next message
- Dynamic: Changes based on conversation context

Step 2: View Suggestions
Section titled “Step 2: View Suggestions”- Scroll to bottom of AI response
- Follow-up section appears below response
- Questions are contextually relevant to the response
Step 3: Use a Suggestion
Section titled “Step 3: Use a Suggestion”- Click any suggested question
- Question automatically populates in input box
- Review and edit if needed
- Send normally or modify before sending
- Suggestion usage is tracked for improvement
Step 4: Suggestion Types
Section titled “Step 4: Suggestion Types”Suggestions include:
- Recent questions: Based on your previous questions
- Topic-based: Generated from conversation topics
- Contextual: Related to current response content
- Exploratory: Help you dive deeper into topics
Key Features Summary
Section titled “Key Features Summary”Input Features
Section titled “Input Features”- Unified Interface: Same input box for all contexts
- Multi-modal Input: Text, voice, files, and evidence
- Character Limits: 2000 character maximum with counter
- Real-time Feedback: Visual indicators for all actions
- Responsive Design: Adapts to screen size and context
File Management Features
Section titled “File Management Features”- Multiple File Types: PDFs, Word, images, Excel, and more
- Drag and Drop: Easy file attachment from file system
- Evidence Integration: Reference knowledge library documents
- Visual Previews: File bubbles with type indicators
- Project Association: Files color-coded by project
Voice Features
Section titled “Voice Features”- One-click Recording: Simple microphone activation
- Auto-transcription: Real-time speech-to-text
- Auto-stop: Stops after silence detection
- Permission Management: Clear error handling
- Transcript Editing: Edit before sending
Configuration Features
Section titled “Configuration Features”- Agent Roles: Customize AI persona
- Tone Selection: Professional or casual communication
- Style Options: Serious to humorous range
- Project Selection: Focus on specific projects
- Source Mode: Control knowledge base usage
Response Features
Section titled “Response Features”- Citation System: Numbered references to sources
- Document Viewer: Click citations to view sources
- Follow-up Suggestions: AI-generated next questions
- Processing Indicators: Clear loading states
- Error Recovery: Graceful error handling
Best Practices
Section titled “Best Practices”Composing Messages
Section titled “Composing Messages”- Be Specific: Clear, specific questions get better answers
- Use Context: Reference previous messages when needed
- Attach Relevant Files: Include documents that support your question
- Select Projects: Narrow focus to relevant projects
- Review Before Sending: Check for typos and clarity
File Management
Section titled “File Management”- Limit Attachments: Keep to essential files (max 4 items)
- Use Descriptive Names: Name files clearly for easier reference
- Combine Related Files: Attach related documents together
- Use Source Mode Wisely: Toggle to “+Source” when you want knowledge base access, or leave as “No Source” (default) for file-only focus
- Remove Unused Files: Clean up attachments before sending
Voice Input
Section titled “Voice Input”- Speak Clearly: Enunciate for better transcription
- Use Quiet Environment: Reduce background noise
- Review Transcripts: Always check transcription accuracy
- Edit Before Sending: Correct any transcription errors
- Grant Permissions: Allow microphone access for best experience
Agent Configuration
Section titled “Agent Configuration”- Match Role to Task: Select role appropriate for your question
- Consistent Settings: Keep tone/style consistent within a chat
- Experiment: Try different configurations to find your preference
- Profile Sync: Settings sync with your profile defaults
- Context Matters: Adjust based on conversation topic
Project Selection
Section titled “Project Selection”- Be Selective: Choose only relevant projects
- Use “All Knowledge”: When you need broad search
- Multiple Projects: Select multiple for cross-project queries
- Auto-selection: Let evidence drops auto-select projects
- Clear When Done: Reset to “All Knowledge” when switching topics
Working with Citations
Section titled “Working with Citations”- Click to Explore: Click citations to verify sources
- Check Page Numbers: Verify cited pages are accurate
- Use Multiple Citations: Reference multiple sources when needed
- Navigate Efficiently: Use citation sidebar for quick navigation
- Understand Context: Citations show where information came from
Using Suggestions
Section titled “Using Suggestions”- Click to Use: Quick way to continue conversation
- Edit if Needed: Modify suggestions before sending
- Explore Topics: Use suggestions to dive deeper
- Track Usage: System learns from your question patterns
- Start New Chats: Use suggestions to begin conversations
Troubleshooting
Section titled “Troubleshooting”Issue: Input Box Not Appearing
Section titled “Issue: Input Box Not Appearing”Solutions:
- Refresh the page
- Check if you’re logged in
- Verify chat interface is loaded
- Clear browser cache if issues persist
- Check browser console for errors
Issue: Files Not Attaching
Section titled “Issue: Files Not Attaching”Solutions:
- Check file size limits
- Verify file type is supported
- Ensure you haven’t exceeded 4-item limit
- Try drag and drop instead of file picker
- Check browser permissions for file access
Issue: Voice Recording Not Working
Section titled “Issue: Voice Recording Not Working”Solutions:
- Grant microphone permission in browser settings
- Check microphone is connected and working
- Verify browser supports speech recognition
- Try refreshing the page
- Check browser console for errors
- Use text input as alternative
Issue: Character Limit Reached
Section titled “Issue: Character Limit Reached”Solutions:
- Split message into multiple parts
- Remove unnecessary text
- Use file attachments for long content
- Summarize your question
- Character limit is 2000 characters
Issue: Message Not Sending
Section titled “Issue: Message Not Sending”Solutions:
- Check internet connection
- Verify you’re still logged in
- Wait for previous message to complete
- Refresh page and retry
- Check for error messages in chat
- Clear browser cache
Issue: Citations Not Appearing
Section titled “Issue: Citations Not Appearing”Solutions:
- Citations only appear when AI references documents
- Check if documents are available in knowledge base
- Verify project selection includes document projects
- Ensure files were uploaded successfully
- Wait for response to fully load
Issue: Suggestions Not Showing
Section titled “Issue: Suggestions Not Showing”Solutions:
- Suggestions appear after AI responses
- Check if suggestions are enabled in your profile
- Wait for response to complete
- Refresh page if suggestions don’t appear
- Suggestions may not appear for very short responses
Issue: Project Selection Not Working
Section titled “Issue: Project Selection Not Working”Solutions:
- Verify you have access to selected projects
- Check project permissions in your profile
- Try selecting “All Knowledge” instead
- Refresh page to reload project list
- Contact admin if projects are missing
Issue: Source Mode Toggle Missing
Section titled “Issue: Source Mode Toggle Missing”Solutions:
- Toggle only appears when files are attached
- Attach at least one file to see toggle
- Check if files uploaded successfully
- Refresh page if toggle doesn’t appear
- Verify files are in supported format
Issue: Drag and Drop Not Working
Section titled “Issue: Drag and Drop Not Working”Solutions:
- Ensure files are valid and not corrupted
- Check browser supports drag and drop
- Try file picker instead
- Verify you haven’t exceeded item limit
- Check browser console for errors
Security Notes
Section titled “Security Notes”- File Uploads: Files are uploaded securely and associated with your account
- Voice Data: Voice recordings are processed locally and not stored
- Project Access: You can only access projects you have permission for
- Message Privacy: Messages are private to your account and organization
- Citation Sources: Citations only reference documents you have access to