Managing Files
This procedure guide explains how to use the Managing Files feature to upload multiple files to your organization’s knowledge library. The managing files process allows administrators to efficiently upload documents, organize them into folders, and assign them to projects.
Table of Contents
Section titled “Table of Contents”- Accessing the Managing Files Feature
- Understanding the Managing Files Interface
- Selecting a Project
- Adding Files to Upload
- Organizing Files with Folders
- Reviewing the Upload Queue
- Processing and Uploading Files
- Managing Uploaded Files
- Key Features Summary
- Best Practices
- Troubleshooting
- Security Notes
Accessing the Managing Files Feature
Section titled “Accessing the Managing Files Feature”Step 1: Navigate to Admin Dashboard
Section titled “Step 1: Navigate to Admin Dashboard”- Log in to the application with admin privileges
- Navigate to the Admin Dashboard (typically accessible from the main navigation menu)
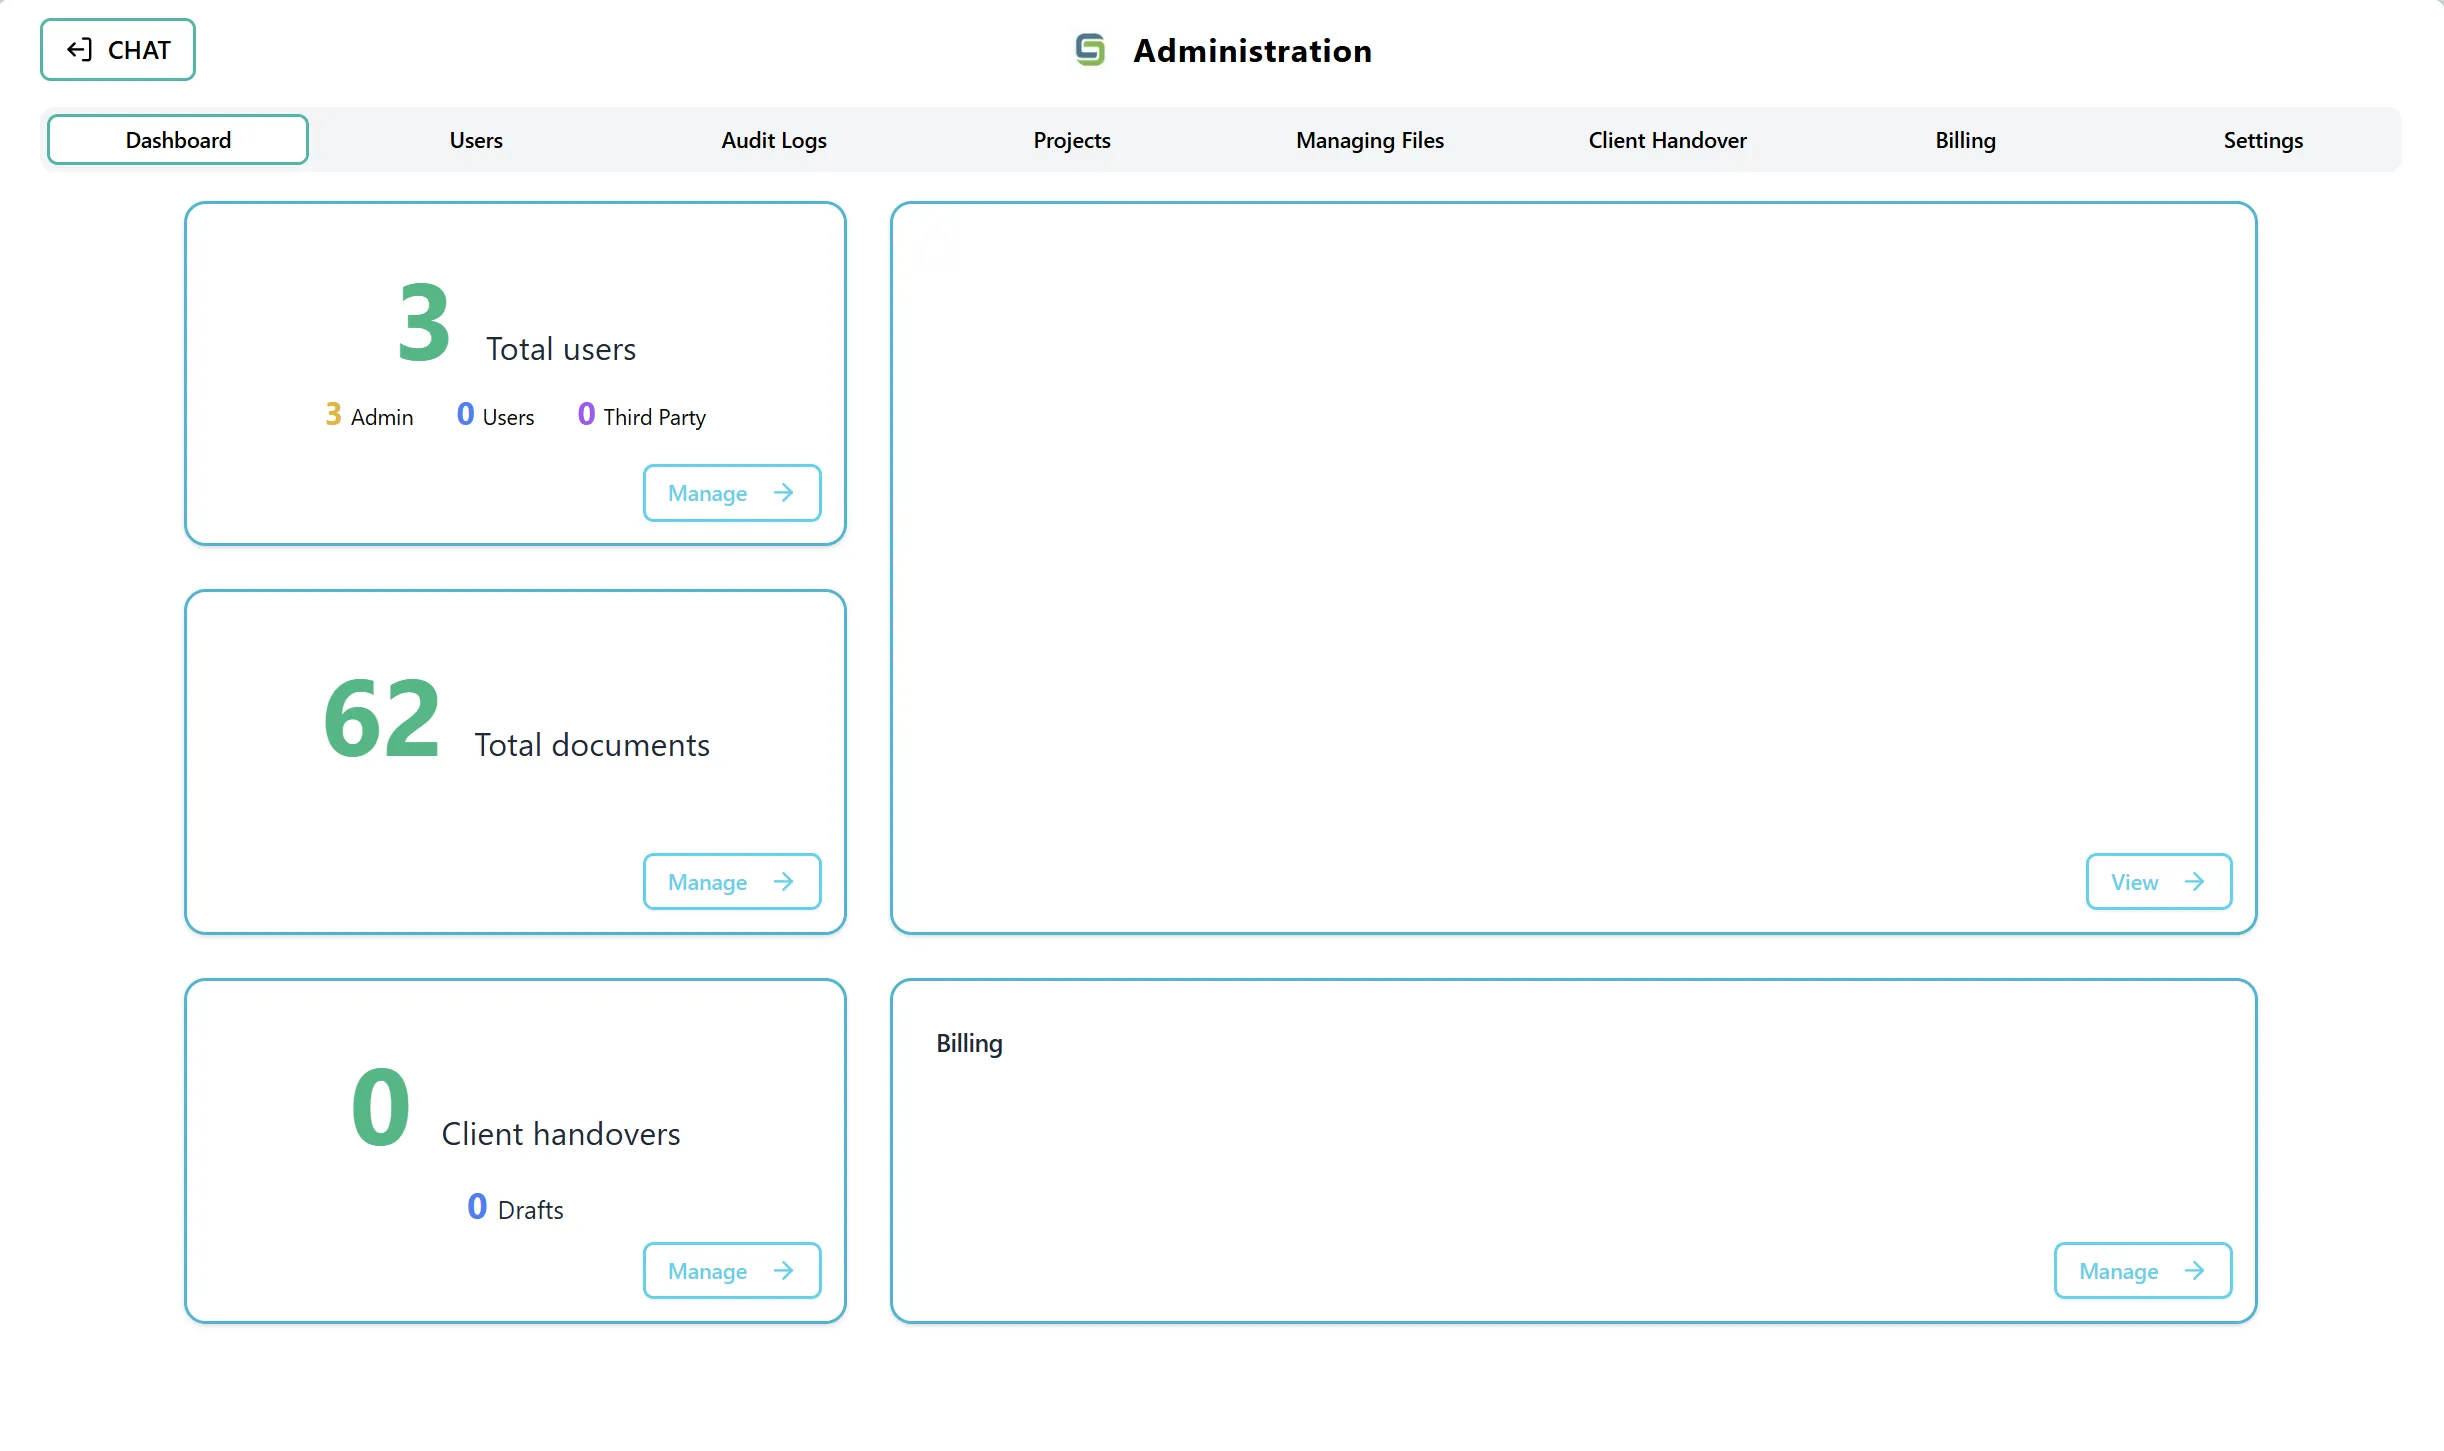
- The dashboard displays several cards showing statistics and quick access to different admin features
Step 2: Access the Managing Files Feature
Section titled “Step 2: Access the Managing Files Feature”You can access the managing files feature in two ways:
Option A: Using the Documents Card On the Admin Dashboard, you will see a card labeled “Total documents” that displays:
- Total number of documents in your organization (in green)
- A “Manage” button in the bottom-right corner
Option B: Using the Navigation Tab You can also directly select the “Managing Files” tab from the top navigation tabs in the Admin section. This tab is located alongside other admin sections such as Dashboard, Users, Audit Logs, Projects, Client Handover, and Settings.
Understanding the Managing Files Interface
Section titled “Understanding the Managing Files Interface”
After accessing the Managing Files feature, you will see a two-panel layout:
Left Panel - Processing File Sources:
- Displays files you have selected for upload
- Shows a drag-and-drop zone for adding files
- Includes a “Browse files to upload” button
- Shows file count and organization options
Right Panel - Upload Queue:
- Displays the upload queue with files organized in a tree structure
- Shows existing files from the knowledge library
- Allows you to organize files into folders
- Displays upload progress and status
Top Section:
- Title: “Processing File Sources”
- Action Buttons: “Clear Processing Changes” and “Update & Process” buttons
- Project Selection: Dropdown to select the target project (positioned above the panels)
Selecting a Project
Section titled “Selecting a Project”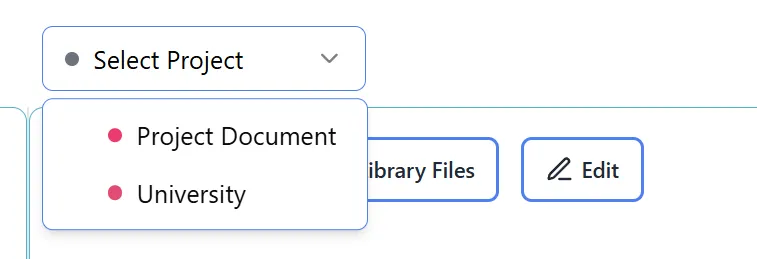
Step 1: Locate the Project Dropdown
Section titled “Step 1: Locate the Project Dropdown”- Look for the Project dropdown located above the two-panel layout
- The dropdown is positioned on the right side, above the right panel
- It shows “Select Project” as placeholder text when no project is selected
Step 2: Select a Project
Section titled “Step 2: Select a Project”- Click on the Project dropdown
- A list of available projects will appear
- Each project is displayed with:
- A colored dot indicating the project color
- The project name
- Click on the project you want to assign the uploaded files to
- The selected project will be displayed in the dropdown
Important: You must select a project before you can upload files. The upload button will be disabled until a project is selected.
Step 3: Verify Project Selection
Section titled “Step 3: Verify Project Selection”- After selecting a project, you will see:
- The project name displayed in the dropdown
- A colored indicator showing the project color
- The project name may also appear in the left panel showing where files will be uploaded
Adding Files to Upload
Section titled “Adding Files to Upload”
Step 1: Choose Your Upload Method
Section titled “Step 1: Choose Your Upload Method”You can add files to upload in two ways:
Method A: Drag and Drop
- Open your file explorer or finder
- Select the files you want to upload (you can select multiple files)
- Drag the files over the left panel (Processing File Sources)
- The panel will highlight when you drag files over it
- Drop the files in the highlighted area
Method B: Browse Files
- Click the “Browse files to upload” button in the left panel
- A file browser dialog will open
- Navigate to the files you want to upload
- Select one or multiple files (hold Ctrl/Cmd to select multiple files)
- Click “Open” to add the files
Step 2: Supported File Types
Section titled “Step 2: Supported File Types”The managing files feature supports the following file types:
- PDF files (
.pdf) - Word documents (
.docx) - Text files (
.txt) - ZIP files (
.zip,.zipx) - ZIP files will be automatically extracted
Step 3: File Selection Feedback
Section titled “Step 3: File Selection Feedback”After adding files, you will see:
- Files listed in the left panel
- File names and types displayed
- File count updated
- If you uploaded a ZIP file, you’ll see a message indicating extraction is in progress
Step 4: ZIP File Extraction
Section titled “Step 4: ZIP File Extraction”If you upload a ZIP file:
- The system will automatically detect it as a ZIP file
- A loading indicator will appear showing “Extracting ZIP files…”
- The ZIP file contents will be extracted and displayed
- Individual files from the ZIP will appear in your file list
- The button text will update to show “(X from ZIP)” indicating extracted files
Organizing Files with Folders
Section titled “Organizing Files with Folders”
Step 1: Understanding Folder Organization
Section titled “Step 1: Understanding Folder Organization”Files in the upload queue can be organized into folders to maintain structure in your knowledge library. You can:
- Create new folders
- Create subfolders within existing folders
- Drag and drop files into folders
- Delete folders (if empty)
Step 2: Creating a New Folder
Section titled “Step 2: Creating a New Folder”- In the right panel (Upload Queue), look for folder creation options
- Click the “New Folder” button or icon (typically a ”+” or folder icon)
- A dialog will appear asking for the folder name
- Enter a descriptive folder name
- Click “Create” or “OK” to create the folder
- The new folder will appear in the upload queue tree
Step 3: Creating a Subfolder
Section titled “Step 3: Creating a Subfolder”- Right-click on an existing folder (or use the folder’s menu)
- Select “Create Subfolder” or similar option
- Enter a name for the subfolder
- Click “Create” to add the subfolder
- The subfolder will appear nested under the parent folder
Step 4: Organizing Files into Folders
Section titled “Step 4: Organizing Files into Folders”Using Drag and Drop:
- Click and hold on a file in the upload queue
- Drag it over a folder
- The folder will highlight when you hover over it
- Release the mouse button to drop the file into the folder
- The file will move into the folder structure
Note: You can drag multiple files at once by selecting them first, then dragging the selection.
Step 5: Removing Files from Folders
Section titled “Step 5: Removing Files from Folders”- To move a file out of a folder, drag it to the root level of the upload queue
- Or drag it to a different folder
- Files can be reorganized at any time before processing
Reviewing the Upload Queue
Section titled “Reviewing the Upload Queue”Step 1: Understanding the Upload Queue Panel
Section titled “Step 1: Understanding the Upload Queue Panel”The right panel shows your upload queue with:
- Existing Files: Files already in your knowledge library (can be toggled on/off)
- New Files: Files you’ve added for upload
- Folder Structure: Any folders you’ve created
- File Organization: How files are organized before upload
Step 2: Viewing Existing Files
Section titled “Step 2: Viewing Existing Files”- By default, existing files from your knowledge library are shown
- You can toggle this view using the “Show Existing Files” option
- This helps you see what’s already in the library and avoid duplicates
- Existing files are typically displayed in a different style or color
Step 3: Reviewing File Details
Section titled “Step 3: Reviewing File Details”In the upload queue, you can see:
- File names: The name of each file
- File types: Icons or labels indicating file type (PDF, DOCX, TXT)
- Folder structure: How files are organized
- File count: Total number of files ready for upload
Step 4: Selecting Files
Section titled “Step 4: Selecting Files”- Click on files to select them
- Selected files may be highlighted
- You can select multiple files for batch operations
- Selected files can be moved, organized, or removed
Processing and Uploading Files
Section titled “Processing and Uploading Files”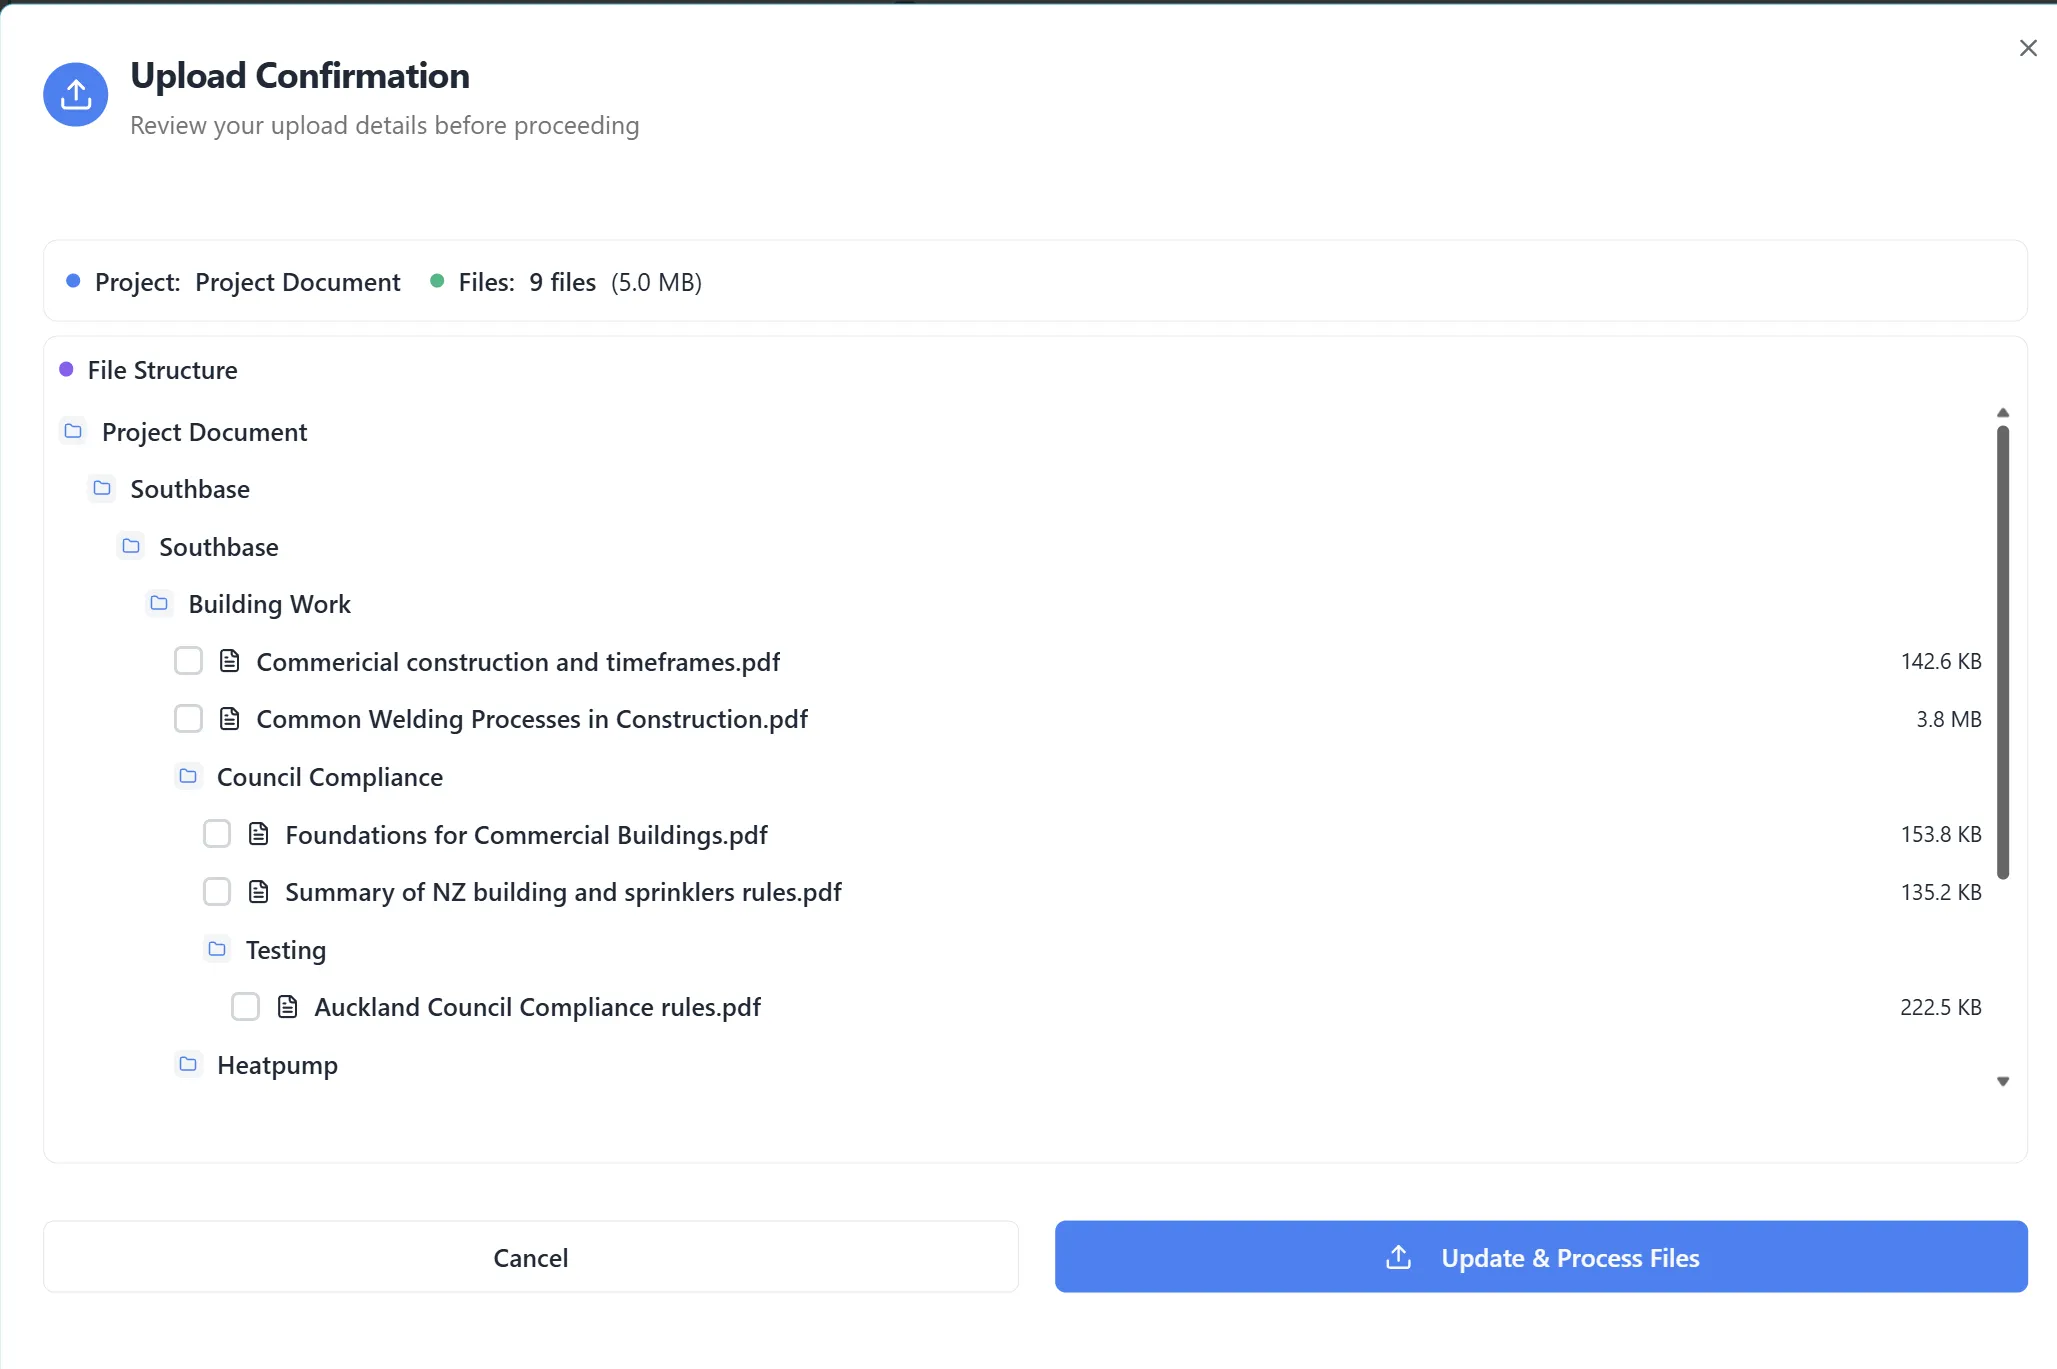
Step 1: Final Review Before Upload
Section titled “Step 1: Final Review Before Upload”Before processing, ensure:
- Project is selected: A project must be chosen from the dropdown
- Files are added: At least one file should be in the upload queue
- Files are organized: Files are in the desired folder structure (if applicable)
- No errors: Check for any error messages or warnings
Step 2: Understanding Upload Options
Section titled “Step 2: Understanding Upload Options”At the top of the interface, you’ll see two main action buttons:
Clear Processing Changes:
- Clears all files from the upload queue
- Resets the interface to start fresh
- Requires confirmation before clearing
Update & Process:
- Processes and uploads all files in the queue
- Only enabled when:
- A project is selected
- Files are in the upload queue
- Shows file count in the button text
Step 3: Starting the Upload
Section titled “Step 3: Starting the Upload”- Verify your project selection is correct
- Review the files in your upload queue
- Check the file count displayed in the “Update & Process” button
- Click the “Update & Process” button
- The upload process will begin
Step 4: Upload Progress
Section titled “Step 4: Upload Progress”During the upload process, you will see:
Progress Indicators:
- Individual file progress bars
- Overall upload progress
- Upload status for each file (uploading, completed, error)
- Estimated time remaining (if available)
Status Updates:
- Files will show as “Uploading…” while in progress
- Completed files will show a checkmark or “Completed” status
- Failed files will show an error indicator
Upload Button Changes:
- The button text changes to “View Upload Progress” or “Processing…”
- A loading spinner appears
- The button may be disabled during upload
Step 5: Upload Completion
Section titled “Step 5: Upload Completion”When the upload is complete:
- A success message will appear
- All files will show as “Completed”
- Files will be available in your knowledge library
- Files will be associated with the selected project
- Files will maintain their folder structure (if organized)
Step 6: Handling Upload Errors
Section titled “Step 6: Handling Upload Errors”If a file fails to upload:
- The file will show an error status
- An error message may be displayed
- You can retry the upload for failed files
- Check file size, format, and permissions if errors occur
Managing Uploaded Files
Section titled “Managing Uploaded Files”Step 1: Viewing Upload Results
Section titled “Step 1: Viewing Upload Results”After upload completion:
- Files are immediately available in your knowledge library
- You can access them through the knowledge library interface
- Files maintain the folder structure you created
- Files are associated with the selected project
Step 2: Edit Mode (Optional)
Section titled “Step 2: Edit Mode (Optional)”Some versions of the interface may include an Edit Mode:
- Toggle edit mode to modify the upload queue
- Reorganize files before final processing
- Make changes to folder structure
- Save changes or cancel edits
Step 3: Clearing the Upload Queue
Section titled “Step 3: Clearing the Upload Queue”To start a new upload session:
- Click the “Clear Processing Changes” button
- Confirm the action when prompted
- All files will be removed from the queue
- You can start fresh with new files
Step 4: Upload History
Section titled “Step 4: Upload History”- Uploaded files are tracked in your organization
- You can view upload history through the knowledge library
- Files are searchable and accessible immediately after upload
- Upload activity may be logged in audit trails
Key Features Summary
Section titled “Key Features Summary”File Upload Features
Section titled “File Upload Features”- Drag & Drop: Intuitive file selection by dragging files
- File Browser: Traditional file selection method
- ZIP Support: Automatic extraction of ZIP file contents
- Multiple Files: Upload many files at once
- Progress Tracking: Real-time upload progress for each file
Organization Features
Section titled “Organization Features”- Folder Creation: Create custom folders for organization
- Subfolders: Nested folder structure support
- Drag & Drop Organization: Easily move files between folders
- Folder Management: Create, rename, and delete folders
Project Management Features
Section titled “Project Management Features”- Project Selection: Assign files to specific projects
- Visual Indicators: Color-coded project selection
- Project Association: Automatic linking to selected project
Upload Management Features
Section titled “Upload Management Features”- Queue Review: Preview files before upload
- Batch Processing: Process all files together
- Error Handling: Clear error messages and retry options
- Progress Monitoring: Track upload status in real-time
Best Practices
Section titled “Best Practices”Before Uploading
Section titled “Before Uploading”- Organize Files First: Plan your folder structure before uploading
- Check File Types: Ensure all files are in supported formats
- Select Project: Choose the correct project before adding files
- Review File Names: Use descriptive file names for easier searching
- Check File Sizes: Very large files may take longer to upload
During Upload
Section titled “During Upload”- Don’t Close Browser: Keep the browser open during upload
- Monitor Progress: Watch for any errors or issues
- Be Patient: Large files or many files may take time
- Check Network: Ensure stable internet connection
After Upload
Section titled “After Upload”- Verify Files: Check that all files uploaded successfully
- Review Organization: Confirm files are in correct folders
- Test Access: Verify files are accessible in knowledge library
- Document Structure: Note your folder structure for future reference
Troubleshooting
Section titled “Troubleshooting”Issue: Upload Button is Disabled
Section titled “Issue: Upload Button is Disabled”Solutions:
- Ensure a project is selected from the dropdown
- Verify that files have been added to the upload queue
- Check that files are in supported formats
- Try refreshing the page if the issue persists
Issue: Files Not Appearing in Upload Queue
Section titled “Issue: Files Not Appearing in Upload Queue”Solutions:
- Verify files are in supported formats (PDF, DOCX, TXT, ZIP)
- Check file size limits
- Try adding files one at a time to identify problematic files
- Clear the queue and try again
Issue: ZIP File Not Extracting
Section titled “Issue: ZIP File Not Extracting”Solutions:
- Ensure the ZIP file is not corrupted
- Check that the ZIP file contains supported file types
- Try extracting the ZIP manually and uploading individual files
- Verify ZIP file format (.zip or .zipx)
Issue: Upload Fails or Stops
Section titled “Issue: Upload Fails or Stops”Solutions:
- Check your internet connection
- Verify file sizes are within limits
- Check browser console for error messages
- Try uploading files in smaller batches
- Retry failed files individually
Issue: Files Not in Correct Folders
Section titled “Issue: Files Not in Correct Folders”Solutions:
- Use drag and drop to reorganize files before processing
- Create folders before adding files for better organization
- Review folder structure in the upload queue before clicking “Update & Process”
- Files can be reorganized in the knowledge library after upload if needed
Issue: Project Not Selected
Section titled “Issue: Project Not Selected”Solutions:
- Locate the project dropdown above the panels
- Select a project before adding files
- Verify project selection is visible in the dropdown
- Ensure you have access to projects in your organization
Security Notes
Section titled “Security Notes”- Only users with admin privileges can access the managing files feature
- Uploaded files are associated with your organization
- Files are stored securely in the knowledge library
- Upload activity may be logged for audit purposes
- File access follows organization permission settings